# Spring
# 第 1 章 Spring 基本介绍
# 1.1 官方资料
# 1.2 Spring 学习的核心内容
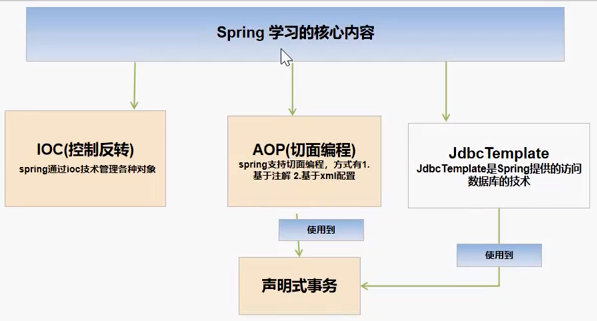
(1)Spring 核心学习内容 IOC、AOP、JDBCTemplate、声明式事务
(2)IOC:控制反转,可以管理 Java 对象
(3)AOP:切面编程
(4)JDBCTemplate:是 Spring 提供的一套访问数据库的技术
(5)声明式事务:基于 IOC/AOP 实现事务管理
# 1.3 Spring 几个重要概念
(1)Spring 可以整合其他的框架(Spring 是管理框架的框架)
(2)Spring 有两个核心的概念:IOC 和 AOP
(3)IOC(Inversion Of Control 反转控制)
(4)传统的开发模式(比如 JDBCUtils / 反射)
程序 ---> 环境 //程序读取环境配置,然后自己创建对象
以连接到数据库为例说明:
1)程序员编写程序,在程序中读取配置信息
2)创建对象,new XxxObject()
3)使用对象完成任务
(5)IOC 的开发模式
程序 <--- 容器 //容器创建好对象数据,程序直接使用(IOC 控制反转)
1)Spring 根据配置文件 xml 或者 注解的方式创建对象,并放入到容器(ConcurrentHashMap)中,并且可以完成对象之间的依赖
2)当需要使用某个对象实例的时候,传统的方法是 new Xxxx(),IOC 的开发模式在需要使用某个对象实例时直接从容器中获取即可
(6)DI(Dependency Injection 依赖注入),可以理解成是 IOC 的另外的叫法
(7)Spring 最大的价值就是通过配置给程序提供需要使用的各个对象,可以实现解耦
# 1.4 Spring 快速入门
# 1.4.1 需求说明
通过 Spring 的方式获取 JavaBean 中的 Monster 对象,并给该对象的属性赋值,输出该对象的信息
# 1.4.2 完成步骤
beans.xml
<?xml version="1.0" encoding="UTF-8"?>
<beans xmlns="http://www.springframework.org/schema/beans"
       xmlns:xsi="http://www.w3.org/2001/XMLSchema-instance"
       xsi:schemaLocation="http://www.springframework.org/schema/beans http://www.springframework.org/schema/beans/spring-beans.xsd">

    <!--
        (1) 配置 monster 对象
        (2) 在 beans 中可以配置多个 bean
        (3) bean 表示就是一个 Java 对象
        (4) class 属性是用于指定类的全路径,Spring 底层使用反射创建
        (5) id 属性表示该 Java 对象在 Spring 容器中的 id,通过 id 可以获取到该对象
        (6) <property name="monsterId" value="100"/> 用于给该对象的属性赋值
    -->
    <bean class="com.hspedu.spring.bean.Monster" id="monster01">
        <property name="monsterId" value="100"/>
        <property name="name" value="牛魔王"/>
        <property name="skill" value="芭蕉扇"/>
    </bean>
</beans>
2
3
4
5
6
7
8
9
10
11
12
13
14
15
16
17
18
19
public class Monster {
    private Integer monsterId;
    private String name;
    private String skill;

    public Monster(Integer monsterId, String name, String skill) {
        this.monsterId = monsterId;
        this.name = name;
        this.skill = skill;
    }

    //无参构造器一定要写,Spring 反射创建对象时需要使用
    public Monster() {
    }

    public Integer getMonsterId() {
        return monsterId;
    }

    public void setMonsterId(Integer monsterId) {
        this.monsterId = monsterId;
    }

    public String getName() {
        return name;
    }

    public void setName(String name) {
        this.name = name;
    }

    public String getSkill() {
        return skill;
    }

    public void setSkill(String skill) {
        this.skill = skill;
    }

    @Override
    public String toString() {
        return "Monster{" +
                "monsterId=" + monsterId +
                ", name='" + name + '\'' +
                ", skill='" + skill + '\'' +
                '}';
    }
}
2
3
4
5
6
7
8
9
10
11
12
13
14
15
16
17
18
19
20
21
22
23
24
25
26
27
28
29
30
31
32
33
34
35
36
37
38
39
40
41
42
43
44
45
46
47
48
public class SpringBeanTest {
    @Test
    public void getMonster() {
        //(1) 创建容器 ApplicationContext
        //(2) 该容器和容器配置文件关联
        //(3) ClassPathXmlApplicationContext 类的作用可以简单理解成用于解析 XML 文件,获取 bean 的信息,然后根据类的全路径通过反射创建对象后放入到 HashMap 中,并且提供方法可以通过 id 获取到该对象
        ApplicationContext ioc = new ClassPathXmlApplicationContext("beans.xml");
        //(3) 通过 getBean 获取对应的对象,此方法获取到的对象是 Object 类型的
        //Object monster01 = ioc.getBean("monster01");
        Monster monster01 = (Monster) ioc.getBean("monster01");
        //(4) 输出
        System.out.println("monster01" + monster01 + " 运行类型 = " + monster01.getClass());
        System.out.println("monster01" + monster01 + " 获取对应的属性 name = " + monster01.getName() + " monsterid = " + monster01.getMonsterId());
        //(5) 也可以在获取的时候,直接指定 Class 类型
        Monster monster011 = ioc.getBean("monster01", Monster.class);
        System.out.println("monster011 = " + monster011);
        System.out.println("monster011.name = " + monster011.getName());
        System.out.println("ok~~~");
    }
}
2
3
4
5
6
7
8
9
10
11
12
13
14
15
16
17
18
19
20
# 1.4.3 注意事项和细节
(1)ClassPathXmlApplicationContext ioc = new ClassPathXmlApplicationContext("beans.xml"); 是怎么读取到 beans.xml 的?
//验证类加载路径
    public void classPath() {
        File file = new File(this.getClass().getResource("/").getPath());
        //看到类的加载路径
        System.out.println("file = " + file); //file = D:\Study\Code\IDEA\hspedu_spring\spring\out\production\spring
    }
2
3
4
5
6
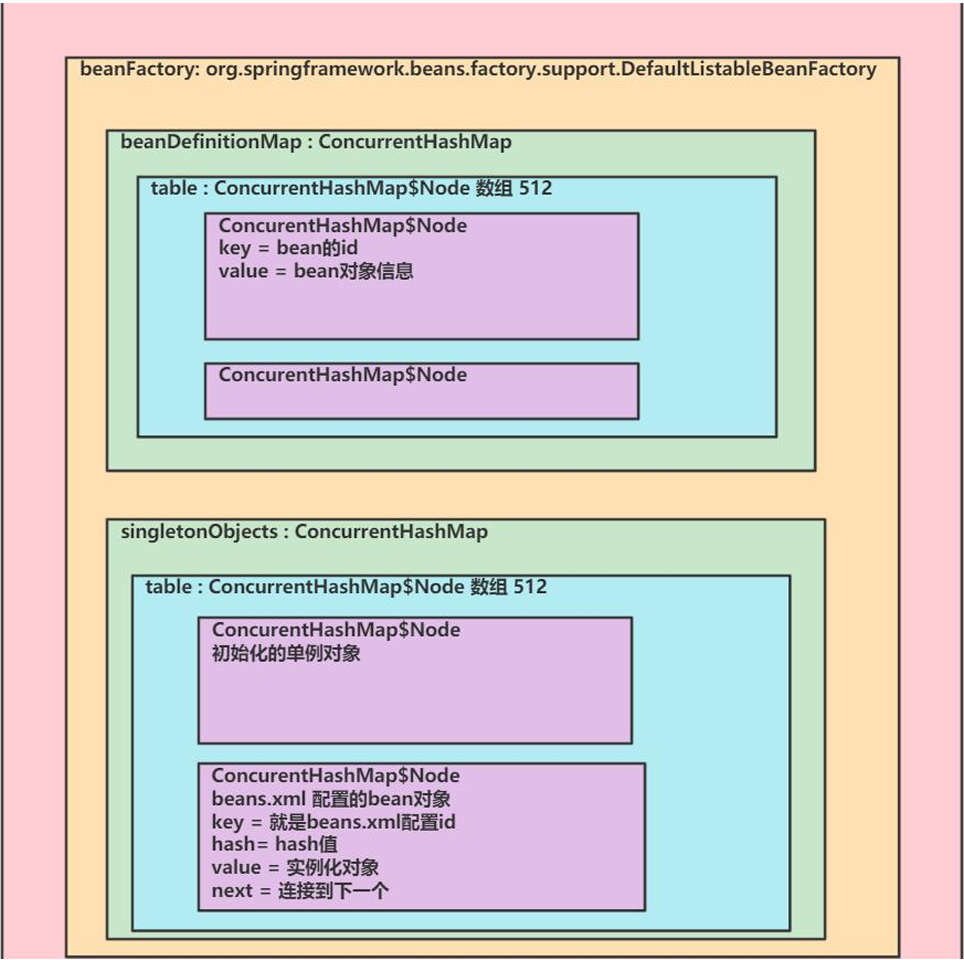
(2)debug 看 Spring 容器结构/机制
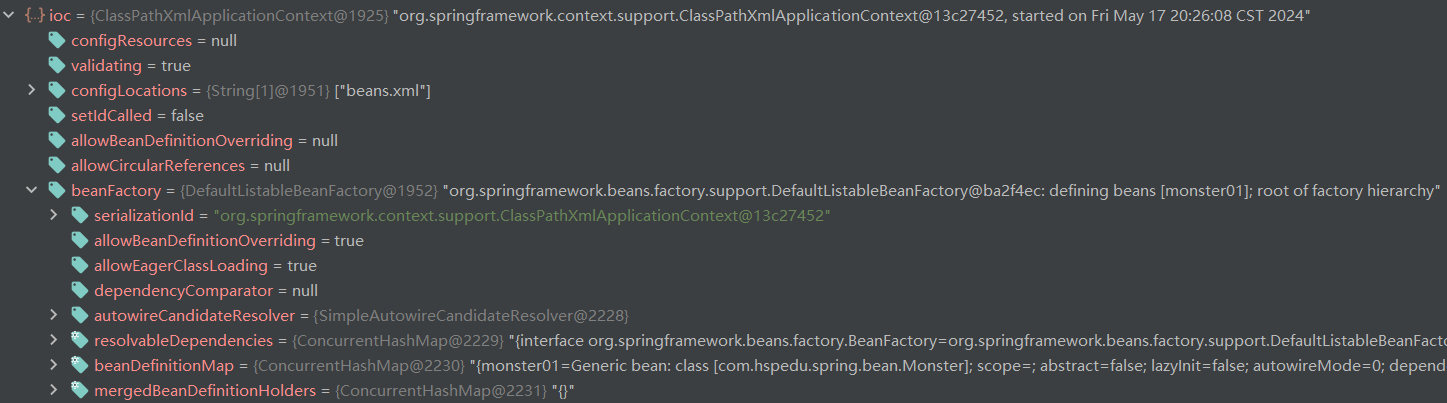
beanDefinitionMap 类型是 ConcurrentHashMap 集合,存放 beans.xml 中的 bean 节点配置的 bean 对象的信息

在 beanDefinitionMap 中有属性 table,table 是数组,类型是 ConcurrentHashMap$Node,因为是数组,所以可以存放很多的 bean 对象信息,就是 beans.xml 配置,初始化大小为 512,当超过时会自动扩容
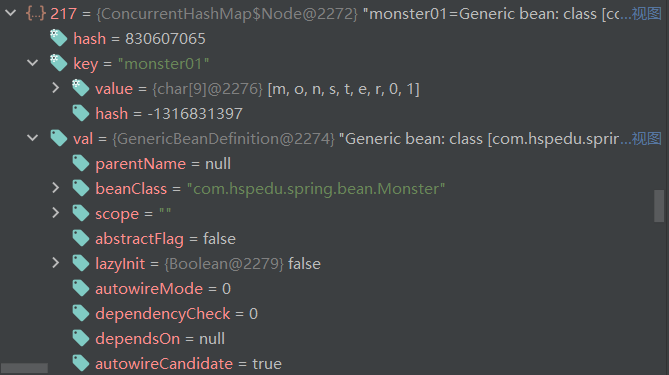
通过 hash 算法,我们的 Monster01 对象的信息就保存在 index=217 的位置,保存方式是以 ConcurrentHashMap$Node 类型保存,key 就是 beans.xml 中配置的 monster01,value 就是 monster01 对象的信息(比如属性/属性值/类信息/是不是懒加载)
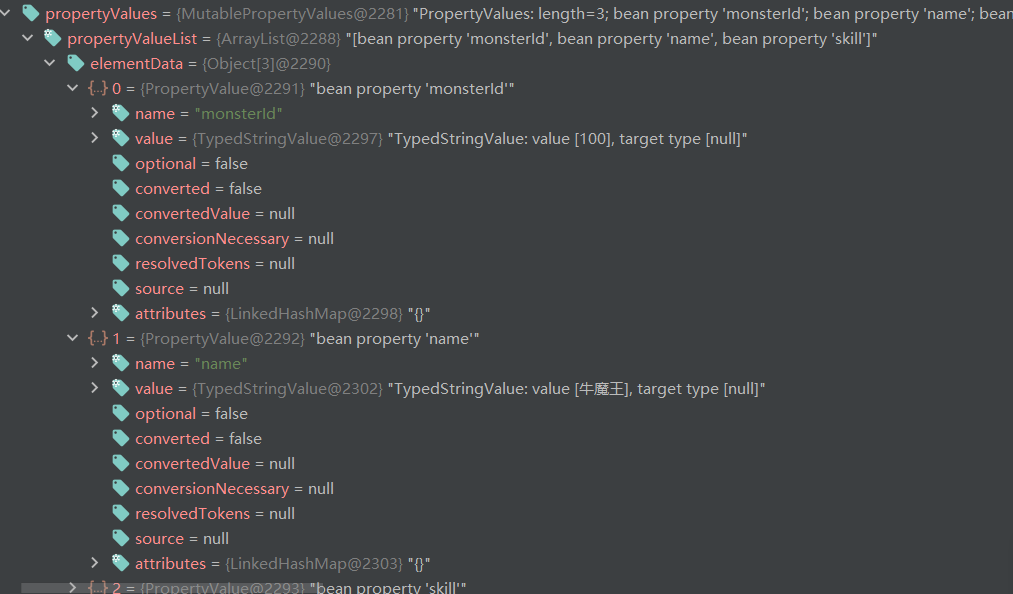
这里就是记录 beans.xml 中配置的 monster01 对象的属性名/属性值
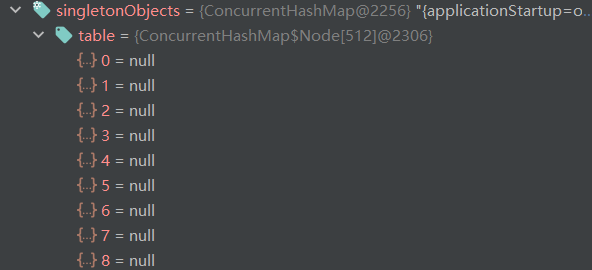
在 beanfactory 中,属性 singletonObjects 类型是 ConcurrentHashMap,还有一个属性 table,类型是 ConcurrentHashMap$Node,如果在 beans.xml 文件中配置的对象是单例的就会初始化放在 table 中
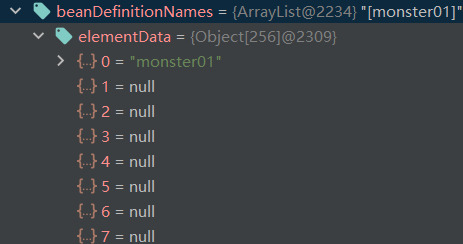
在 beanfactory 中,还有一个属性 beanDefinitionNames,记录了在 beans.xml 中配置的 bean 的名称,方便查找
(3)案例:查看容器注入了哪些 bean 对象,并输出 bean 的 id
//(6) 查看容器注入了哪些 bean 对象,并输出 bean 的 id
        String[] beanDefinitionNames = ioc.getBeanDefinitionNames();
        for (String beanDefinitionName : beanDefinitionNames) {
            System.out.println("beanDefinitionName = " + beanDefinitionName);
        }
2
3
4
5
# 1.5 手动开发简单的 Spring - 基于 XML 配置的程序
# 1.5.1 需求说明
(1)自己写一个简单的 Spring 容器,通过读取 beans.xml,获取第 1 个 JavaBean:Monster 的对象,并给该对象的属性赋值,放入到容器中,输出该对象信息
# 1.5.2 思路分析

# 1.5.3 代码实现
beans.xml
<bean class="com.hspedu.spring.bean.Monster" id="monster01">
	<property name="monsterId" value="100"/>
    <property name="name" value="牛魔王"/>
    <property name="skill" value="芭蕉扇"/>
</bean>
2
3
4
5
/**
 * (1) 这个程序用于实现 Spring 的一个简单容器机制
 * (2) 这里实现如何将 beans.xml 文件进行解析,并生成对象,放入到容器中
 * (3) 提供一个方法 getBean(id) 返回对应的对象
 * */
public class HspApplicationContext {
    private ConcurrentHashMap<String, Object> singletonObjects = new ConcurrentHashMap<>();

    //构造器,接收一个容器的配置文件,比如 beans.xml,该文件默认在 src 下
    public HspApplicationContext(String iocBeanXmlFile) throws Exception {
        //1. 得到类加载路径
        String path = this.getClass().getResource("/").getPath();
        System.out.println("path = " + path);

        //2. 创建 Saxreader
        SAXReader saxReader = new SAXReader();

        //3. 得到 Document 对象
        Document document = saxReader.read(new File(path + iocBeanXmlFile));

        //4. 得到 rootDocument,得到根元素
        Element rootElement = document.getRootElement();

        //5. 得到第一个 bean
        Element bean = (Element) rootElement.elements("bean").get(0);

        //6. 获取到第一个 bean 的相关属性
        String id = bean.attributeValue("id");
        String classFullPath = bean.attributeValue("class");
        System.out.println(id);
        System.out.println(classFullPath);
        List<Element> property = bean.elements("property");
        //遍历获取,这里直接获取
        Integer monsterId = Integer.parseInt(property.get(0).attributeValue("value"));
        String name = property.get(1).attributeValue("value");
        String skill = property.get(2).attributeValue("value");

        //7. 使用反射创建对象
        Class<?> aClass = Class.forName(classFullPath);
        //这里 o 对象就是 Monster 对象
        Monster o = (Monster) aClass.newInstance();
        //给 o 对象赋值
        //利用反射来赋值,这里简化一下,直接赋值,先理解流程
        o.setMonsterId(monsterId);
        o.setName(name);
        o.setSkill(skill);

        //8. 将创建好的对象放入到 singletonObjects
        singletonObjects.put(id, o);
    }
    public Object getBean(String id) {
        return singletonObjects.get(id);
    }
}
2
3
4
5
6
7
8
9
10
11
12
13
14
15
16
17
18
19
20
21
22
23
24
25
26
27
28
29
30
31
32
33
34
35
36
37
38
39
40
41
42
43
44
45
46
47
48
49
50
51
52
53
54
public class HspApplicationContextTest {
    public static void main(String[] args) throws Exception {
        HspApplicationContext ioc = new HspApplicationContext("beans.xml");
        Monster monster01 = (Monster) ioc.getBean("monster01");
        System.out.println("monster01 = " + monster01);
        System.out.println("monster01.name = " + monster01.getName());
        System.out.println("ok");
    }
}
2
3
4
5
6
7
8
9
# 1.6 Spring 原生容器底层结构
# 1.6.1 图解
# 1.6.2 课后作业
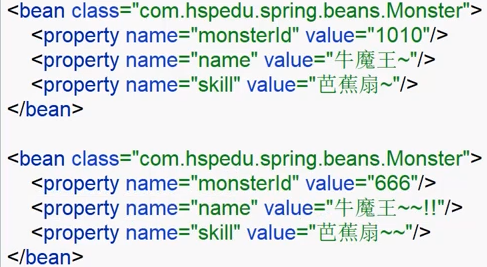
(1)在 beans.xml 中,我们注入 2 个 Monster 对象,但是不指定 id,如下:
(2)问题1:运行会不会报错
答:不会报错,会正常运行
(3)问题2:如果不报错,能否找到分配的 id,并获取到该对象
答:系统会默认分配 id,分配 id 的规则是 全类名#0、全类名#1,按这样的规则来分配 id,可以通过 Debug 方式来查看
public class Homework01 {
    @Test
    public void getMonster() {
        ApplicationContext ioc = new ClassPathXmlApplicationContext("beans.xml");
        Monster monster01 = ioc.getBean("com.hspedu.spring.bean.Monster#0", Monster.class);
        System.out.println("monster01 = " + monster01);
        System.out.println("monster01.monsterId = " + monster01.getMonsterId());

        Monster monster02 = ioc.getBean("com.hspedu.spring.bean.Monster#1", Monster.class);
        System.out.println("monster02 = " + monster02);
        System.out.println("monster02.monsterId = " + monster02.getMonsterId());
    }
}
2
3
4
5
6
7
8
9
10
11
12
13
# 1.7 Spring 课堂练习
需求:创建一个 Car 类(id,name,price),具体要求如下:
(1)创建 ioc 容器文件,并配置一个 Car 对象(bean)
(2)通过 Java 程序到 ioc 容器获取该 bean 对象并输出
public class Car {
    private Integer id;
    private String name;
    private Integer price;

    public Car() {
    }

    public Car(Integer id, String name, Integer price) {
        this.id = id;
        this.name = name;
        this.price = price;
    }

    public Integer getId() {
        return id;
    }

    public void setId(Integer id) {
        this.id = id;
    }

    public String getName() {
        return name;
    }

    public void setName(String name) {
        this.name = name;
    }

    public Integer getPrice() {
        return price;
    }

    public void setPrice(Integer price) {
        this.price = price;
    }

    @Override
    public String toString() {
        return "Car{" +
                "id=" + id +
                ", name='" + name + '\'' +
                ", price=" + price +
                '}';
    }
}
2
3
4
5
6
7
8
9
10
11
12
13
14
15
16
17
18
19
20
21
22
23
24
25
26
27
28
29
30
31
32
33
34
35
36
37
38
39
40
41
42
43
44
45
46
47
<?xml version="1.0" encoding="UTF-8"?>
<beans xmlns="http://www.springframework.org/schema/beans"
       xmlns:xsi="http://www.w3.org/2001/XMLSchema-instance"
       xsi:schemaLocation="http://www.springframework.org/schema/beans http://www.springframework.org/schema/beans/spring-beans.xsd">

    <!--配置 carbean-->
    <bean class="com.hspedu.spring.bean.Car" id="car01">
        <property name="id" value="100"/>
        <property name="name" value="宝马"/>
        <property name="price" value="1000000"/>
    </bean>
</beans>
2
3
4
5
6
7
8
9
10
11
12
public class Homework02 {
    public static void main(String[] args) {
        ApplicationContext ioc = new ClassPathXmlApplicationContext("car_beans.xml");
        Car car01 = ioc.getBean("car01", Car.class);
        System.out.println("car01 = " + car01);
        System.out.println("car01.name = " + car01.getName());
    }
}
2
3
4
5
6
7
8
# 第 2 章 Spring 管理 Bean - IOC
# 2.1 Spring 配置/管理 bean 介绍
(1)Bean 管理包括两方面:
1)创建 bean 对象
2)给 bean 注入属性
(2)Bean 的配置方式:
1)基于 xml 文件配置方式
2)基于注解方式
# 2.2 基于 XML 文件获取和配置 bean
# 2.2.1 通过 id 来获取 bean
之前用的一直是通过 id 来获取 bean
# 2.2.2 通过类型来获取 bean
# 2.2.2.1 应用案例
案例说明:
(1)通过 Spring 的 ioc 容器,获取一个 bean 对象
(2)说明:通过类型来获取 bean
<!--配置 Monster,通过类型来获取-->
    <bean class="com.hspedu.spring.bean.Monster">
        <property name="monsterId" value="1001"/>
        <property name="name" value="牛魔王~"/>
        <property name="skill" value="芭蕉扇~"/>
    </bean>
2
3
4
5
6
//通过 Bean 的类型来获取对象
    public void getBeanByType() {
        ApplicationContext ioc = new ClassPathXmlApplicationContext("beans.xml");
        //这里直接传入 class 对象/类型
        Monster bean = ioc.getBean(Monster.class);
        System.out.println("bean = " + bean);
    }
2
3
4
5
6
7
# 2.2.2.2 细节说明
(1)按类型来获取 bean,要求 ioc 容器中的同一个类的 bean 只能有一个,否则会抛出异常 NoUniqueBeanDefinitionException
(2)这种方式的应用场景:比如 XxxAction/Servlet/Controller/XxxService 在一个线程中只需要一个对象实例的情况
(3)在容器配置文件(比如 beans.xml)中给属性赋值,底层是通过 setter 方法完成的,这也是为什么需要提供 setter 方法的原因
# 2.2.3 通过构造器配置 bean
# 2.2.3.1 说明
在 Spring 的 ioc 容器,可以通过构造器来配置 Bean 对象
# 2.2.3.2 代码实现
public class Monster {
    private Integer monsterId;
    private String name;
    private String skill;

    public Monster(Integer monsterId, String name, String skill) {
        this.monsterId = monsterId;
        this.name = name;
        this.skill = skill;
    }

    //无参构造器一定要写,Spring 反射创建对象时需要使用
    public Monster() {
    }

    public Integer getMonsterId() {
        return monsterId;
    }

    public void setMonsterId(Integer monsterId) {
        this.monsterId = monsterId;
    }

    public String getName() {
        return name;
    }

    public void setName(String name) {
        this.name = name;
    }

    public String getSkill() {
        return skill;
    }

    public void setSkill(String skill) {
        this.skill = skill;
    }

    @Override
    public String toString() {
        return "Monster{" +
                "monsterId=" + monsterId +
                ", name='" + name + '\'' +
                ", skill='" + skill + '\'' +
                '}';
    }
}
2
3
4
5
6
7
8
9
10
11
12
13
14
15
16
17
18
19
20
21
22
23
24
25
26
27
28
29
30
31
32
33
34
35
36
37
38
39
40
41
42
43
44
45
46
47
48
<!--通过构造器配置 bean-->
    <!--
        (1) constructor-arg 标签可以指定使用构造器的参数
        (2) index 表示构造器的第几个参数,从 0 开始计算的
        (3) 除了可以通过 index 还可以通过 name / type 来指定参数方式
    -->
    <bean id="monster03" class="com.hspedu.spring.bean.Monster">
        <constructor-arg value="200" index="0"/>
        <constructor-arg value="白骨精" index="1"/>
        <constructor-arg value="吸人血" index="2"/>
    </bean>

    <bean id="monster04" class="com.hspedu.spring.bean.Monster">
        <constructor-arg value="300" name="monsterId"/>
        <constructor-arg value="白骨精2" name="name"/>
        <constructor-arg value="吸人血2" name="skill"/>
    </bean>

    <bean id="monster05" class="com.hspedu.spring.bean.Monster">
        <constructor-arg value="400" type="java.lang.Integer"/>
        <constructor-arg value="白骨精3" type="java.lang.String"/>
        <constructor-arg value="吸人血3" type="java.lang.String"/>
    </bean>
2
3
4
5
6
7
8
9
10
11
12
13
14
15
16
17
18
19
20
21
22
23
# 2.2.4 通过 p 名称空间配置 bean
# 2.2.4.1 说明
在 Spring 的 ioc 容器中,可以通过 p 名称空间来配置 bean 对象
# 2.2.4.2 代码实现
public class Monster {
    private Integer monsterId;
    private String name;
    private String skill;

    public Monster(Integer monsterId, String name, String skill) {
        this.monsterId = monsterId;
        this.name = name;
        this.skill = skill;
    }

    //无参构造器一定要写,Spring 反射创建对象时需要使用
    public Monster() {
    }

    public Integer getMonsterId() {
        return monsterId;
    }

    public void setMonsterId(Integer monsterId) {
        this.monsterId = monsterId;
    }

    public String getName() {
        return name;
    }

    public void setName(String name) {
        this.name = name;
    }

    public String getSkill() {
        return skill;
    }

    public void setSkill(String skill) {
        this.skill = skill;
    }

    @Override
    public String toString() {
        return "Monster{" +
                "monsterId=" + monsterId +
                ", name='" + name + '\'' +
                ", skill='" + skill + '\'' +
                '}';
    }
}
2
3
4
5
6
7
8
9
10
11
12
13
14
15
16
17
18
19
20
21
22
23
24
25
26
27
28
29
30
31
32
33
34
35
36
37
38
39
40
41
42
43
44
45
46
47
48
<!--通过 p 名称空间来配置 bean-->
    <bean id="monster06" class="com.hspedu.spring.bean.Monster"
          p:monsterId="500"
          p:name="红孩儿"
          p:skill="吐火"
    />
2
3
4
5
6
//通过 Id 获取 bean
    public void setBeanByP() {
        ApplicationContext ioc = new ClassPathXmlApplicationContext("beans.xml");
        Monster monstor06 = ioc.getBean("monster06", Monster.class);
        System.out.println("monstor06 = " + monstor06);
    }
2
3
4
5
6
# 2.2.5 引用/注入其它 bean 对象
# 2.2.5.1 说明
在 Spring 的 ioc 容器中,可以通过 ref 来实现 bean 对象的相互引用
# 2.2.5.2 代码实现
public class MemberDAOImpl {
    public MemberDAOImpl() {
        System.out.println("MemberDAOImpl 构造器被调用");
    }

    public void add() {
        System.out.println("MemberDAOImpl add()方法");
    }
}
2
3
4
5
6
7
8
9
public class MemberServiceImpl {
    private MemberDAOImpl memberDAO;

    public MemberDAOImpl getMemberDAO() {
        return memberDAO;
    }

    public void setMemberDAO(MemberDAOImpl memberDAO) {
        this.memberDAO = memberDAO;
    }

    public void add() {
        System.out.println("MemberServiceImpl add() 被调用");
        memberDAO.add();
    }
}
2
3
4
5
6
7
8
9
10
11
12
13
14
15
16
<!--配置 MemberDAOImpl 对象-->
    <bean class="com.hspedu.spring.dao.MemberDAOImpl" id="memberDAO"/>

    <!--配置 MemberServiceImpl 对象-->
    <!--
        (1) ref = "memberDAO" 表示 MemberServiceImpl 对象的属性 memberDAO 引用的是 id="memberDAO" 的对象
        (2) 这里体现出 Spring 容器的依赖注入
        (3) 注意在 Spring 容器中,它是作为一个整体来执行的,即如果引用到一个bean对象,对配置的顺序没有要求
    -->
    <bean class="com.hspedu.spring.service.MemberServiceImpl" id="memberService">
        <property name="memberDAO" ref="memberDAO"/>
    </bean>
2
3
4
5
6
7
8
9
10
11
12
public void setBeanByRef() {
        ApplicationContext ioc = new ClassPathXmlApplicationContext("beans.xml");
        MemberServiceImpl memberService = ioc.getBean("memberService", MemberServiceImpl.class);
        memberService.add();
    }
2
3
4
5
# 2.2.6 引用/注入内部 bean 对象
# 2.2.6.1 说明
在 Spring 的 ioc 容器,可以直接配置内部 bean 对象
# 2.2.6.2 代码实现
<!--配置 MemberDAOImpl 对象 - 使用内部 bean -->
    <bean class="com.hspedu.spring.service.MemberServiceImpl" id="memberService2">
        <!--自己配置一个内部 bean-->
        <property name="memberDAO">
            <bean class="com.hspedu.spring.dao.MemberDAOImpl" />
        </property>
    </bean>
2
3
4
5
6
7
//通过内部 bean 设置属性
    @Test
    public void setBeanByPro() {
        ApplicationContext ioc = new ClassPathXmlApplicationContext("beans.xml");
        MemberServiceImpl memberService2 = ioc.getBean("memberService2", MemberServiceImpl.class);
        memberService2.add();
    }
2
3
4
5
6
7
# 2.2.7 引用/注入集合/数组类型
# 2.2.7.1 应用实例
在 Spring 的 ioc 容器中,看看如何给 bean 对象的集合/数组类型的属性赋值
# 2.2.7.2 代码实现
public class Monster {
    private Integer monsterId;
    private String name;
    private String skill;

    public Monster(Integer monsterId, String name, String skill) {
        this.monsterId = monsterId;
        this.name = name;
        this.skill = skill;
    }

    //无参构造器一定要写,Spring 反射创建对象时需要使用
    public Monster() {
    }

    public Integer getMonsterId() {
        return monsterId;
    }

    public void setMonsterId(Integer monsterId) {
        this.monsterId = monsterId;
    }

    public String getName() {
        return name;
    }

    public void setName(String name) {
        this.name = name;
    }

    public String getSkill() {
        return skill;
    }

    public void setSkill(String skill) {
        this.skill = skill;
    }

    @Override
    public String toString() {
        return "Monster{" +
                "monsterId=" + monsterId +
                ", name='" + name + '\'' +
                ", skill='" + skill + '\'' +
                '}';
    }
}
2
3
4
5
6
7
8
9
10
11
12
13
14
15
16
17
18
19
20
21
22
23
24
25
26
27
28
29
30
31
32
33
34
35
36
37
38
39
40
41
42
43
44
45
46
47
48
public class Master {
    private String name; //主人名
    private List<Monster> monsterList;
    private Map<String, Monster> monsterMap;
    private Set<Monster> monsterSet;
    private String[] monsterName;
    //这个 Properties 是 Hashtable 的子类,是 key-value 的形式
    //这里的 Properties 的 key 和 value 都是 String
    private Properties pros;

    public String getName() {
        return name;
    }

    public void setName(String name) {
        this.name = name;
    }

    public List<Monster> getMonsterList() {
        return monsterList;
    }

    public void setMonsterList(List<Monster> monsterList) {
        this.monsterList = monsterList;
    }

    public Map<String, Monster> getMonsterMap() {
        return monsterMap;
    }

    public void setMonsterMap(Map<String, Monster> monsterMap) {
        this.monsterMap = monsterMap;
    }

    public Set<Monster> getMonsterSet() {
        return monsterSet;
    }

    public void setMonsterSet(Set<Monster> monsterSet) {
        this.monsterSet = monsterSet;
    }

    public String[] getMonsterName() {
        return monsterName;
    }

    public void setMonsterName(String[] monsterName) {
        this.monsterName = monsterName;
    }

    public Properties getPros() {
        return pros;
    }

    public void setPros(Properties pros) {
        this.pros = pros;
    }

    @Override
    public String toString() {
        return "Master{" +
                "name='" + name + '\'' +
                ", monsterList=" + monsterList +
                ", monsterMap=" + monsterMap +
                ", monsterSet=" + monsterSet +
                ", monsterName=" + Arrays.toString(monsterName) +
                ", pros=" + pros +
                '}';
    }
}
2
3
4
5
6
7
8
9
10
11
12
13
14
15
16
17
18
19
20
21
22
23
24
25
26
27
28
29
30
31
32
33
34
35
36
37
38
39
40
41
42
43
44
45
46
47
48
49
50
51
52
53
54
55
56
57
58
59
60
61
62
63
64
65
66
67
68
69
70
<!--配置 Master 对象-->
    <bean class="com.hspedu.spring.bean.Master" id="master">
        <property name="name" value="太上老君"/>
        <!--给 list 属性赋值-->
        <property name="monsterList">
            <list>
                <!--引用的方式-->
                <ref bean="monster01"/>
                <ref bean="monster02"/>
                <!--使用内部bean的方式创建对象放到这里面-->
                <bean class="com.hspedu.spring.bean.Monster">
                    <property name="name" value="老鼠精"/>
                    <property name="monsterId" value="100"/>
                    <property name="skill" value="吃粮食"/>
                </bean>
            </list>
        </property>
        <!--给 map 属性赋值-->
        <property name="monsterMap">
            <map>
                <entry>
                    <key>
                        <value>monster03</value>
                    </key>
                    <ref bean="monster03"/>
                </entry>
                <entry>
                    <key>
                        <value>monster04</value>
                    </key>
                    <ref bean="monster04"/>
                </entry>
            </map>
        </property>
        <!--给 set 属性赋值-->
        <property name="monsterSet">
            <set>
                <ref bean="monster05"/>
                <ref bean="monster06"/>
                <bean class="com.hspedu.spring.bean.Monster">
                    <property name="name" value="金角大王"/>
                    <property name="skill" value="吐水"/>
                    <property name="monsterId" value="666"/>
                </bean>
            </set>
        </property>
        <!--给数组属性赋值-->
        <property name="monsterName">
            <array>
                <value>小妖怪</value>
                <value>大妖怪</value>
                <value>老妖怪</value>
            </array>
        </property>
        <!--给 Properties 属性赋值 结构 K(String) - V(String) -->
        <property name="pros">
            <props>
                <prop key="username">root</prop>
                <prop key="password">123456</prop>
                <prop key="ip">127.0.0.1</prop>
            </props>
        </property>
    </bean>
2
3
4
5
6
7
8
9
10
11
12
13
14
15
16
17
18
19
20
21
22
23
24
25
26
27
28
29
30
31
32
33
34
35
36
37
38
39
40
41
42
43
44
45
46
47
48
49
50
51
52
53
54
55
56
57
58
59
60
61
62
63
public void setBeanByCollection() {
        ApplicationContext ioc = new ClassPathXmlApplicationContext("beans.xml");
        Master master = ioc.getBean("master", Master.class);
        System.out.println("master = " + master);
    }
2
3
4
5
# 2.2.7.3 使用细节
(1)主要掌握 List/Map/Properties 三种集合的使用
(2)Properties 集合的特点
1)这个 Properties 是 Hashtable 的子类,是 key-value 的形式
2)key 是 string 而 value 也是 string
# 2.2.8 通过 util 名称空间创建 list
public class BookStore {
    private List<String> bookList;

    public BookStore() {
    }

    public List<String> getBookList() {
        return bookList;
    }

    public void setBookList(List<String> bookList) {
        this.bookList = bookList;
    }

    @Override
    public String toString() {
        return "BookStore{" +
                "bookList=" + bookList +
                '}';
    }
}
2
3
4
5
6
7
8
9
10
11
12
13
14
15
16
17
18
19
20
21
之前的
<bean class="com.hspedu.spring.bean.BookStore" id="bookStore">
        <property name="bookList">
            <list>
                <value>三国演义</value>
                <value>红楼梦</value>
                <value>西游记</value>
                <value>水浒传</value>
            </list>
        </property>
    </bean>
2
3
4
5
6
7
8
9
10
如果还有一个书店卖同样的书,那样的话还得再写一遍,可以把同样的代码提取出来
现在的
<bean class="com.hspedu.spring.bean.BookStore" id="bookStore">
        <property name="bookList" ref="myBookList"/>
    </bean>
    <!--如果还有一个书店卖同样的书,那样的话还得再写一遍,可以把同样的代码提取出来-->
    <!--定义一个 util:list 并且指定 id 可以达到数据复用的作用-->
    <util:list id="myBookList">
        <value>三国演义</value>
        <value>红楼梦</value>
        <value>西游记</value>
        <value>水浒传</value>
    </util:list>
2
3
4
5
6
7
8
9
10
11
public void setBeanByUtilList() {
        ApplicationContext ioc = new ClassPathXmlApplicationContext("beans.xml");
        BookStore bookStore = ioc.getBean("bookStore", BookStore.class);
        System.out.println("bookStore = " + bookStore);
    }
2
3
4
5
# 2.2.9 级联属性赋值
# 2.2.9.1 说明
Spring 的 ioc 容器中,可以直接给对象属性的属性赋值,即级联属性赋值
举例:假如有 A 类和 B 类两个类,A 类中有个属性是 B,B 也有自己的属性,直接给 B 的属性赋值就是级联属性赋值
# 2.2.9.2 代码实现
//部门类
public class Dept {
    private String name;

    public Dept() {
    }

    public String getName() {
        return name;
    }

    public void setName(String name) {
        this.name = name;
    }

    @Override
    public String toString() {
        return "Dept{" +
                "name='" + name + '\'' +
                '}';
    }
}
2
3
4
5
6
7
8
9
10
11
12
13
14
15
16
17
18
19
20
21
22
//员工类
public class Emp {
    private String name;
    private Dept dept;

    public Emp() {
    }

    public String getName() {
        return name;
    }

    public void setName(String name) {
        this.name = name;
    }

    public Dept getDept() {
        return dept;
    }

    public void setDept(Dept dept) {
        this.dept = dept;
    }

    @Override
    public String toString() {
        return "Emp{" +
                "name='" + name + '\'' +
                ", dept=" + dept +
                '}';
    }
}
2
3
4
5
6
7
8
9
10
11
12
13
14
15
16
17
18
19
20
21
22
23
24
25
26
27
28
29
30
31
32
<!--配置 Dept 对象-->
    <bean class="com.hspedu.spring.bean.Dept" id="dept"/>
    <!--配置 Emp 对象-->
    <bean class="com.hspedu.spring.bean.Emp" id="emp">
        <property name="name" value="jack"/>
        <property name="dept" ref="dept"/>
        <!--这里希望给 dept 的 name 属性指定值[级联属性赋值]-->
        <property name="dept.name" value="Java开发部门"/>
    </bean>
2
3
4
5
6
7
8
9
//给属性进行级联赋值
    @Test
    public void setBeanByRelation() {
        ApplicationContext ioc = new ClassPathXmlApplicationContext("beans.xml");
        Emp emp = ioc.getBean("emp", Emp.class);
        System.out.println("emp = " + emp);
    }
2
3
4
5
6
7
# 2.2.10 通过静态工厂配置 Bean 对象
# 2.2.10.1 说明
在 Spring 的 ioc 容器中,可以通过静态工厂获取 bean 对象
# 2.2.10.2 代码实现
//静态工厂类,可以返回 Monster 对象
public class MyStaticFactory {
    private static Map<String, Monster> monsterMap;

    //使用 static 代码块进行初始化
    static {
        monsterMap = new HashMap<>();
        monsterMap.put("monster01", new Monster(100, "牛魔王", "芭蕉扇"));
        monsterMap.put("monster02", new Monster(200, "狐狸精", "美人计"));
    }

    //提供一个方法,返回 Monster 对象
    public static Monster getMonster(String key) {
        return monsterMap.get(key);
    }
}
2
3
4
5
6
7
8
9
10
11
12
13
14
15
16
<!--配置 monster 对象,通过静态工厂获取-->
    <!--
        (1) 通过静态工厂配置 bean
        (2) class 是静态工厂类的全路径
        (3) factory-method 表示指定静态工厂类的哪个方法返回对象
        (4) constructor-arg value="monster02" 中 value 是指定要返回静态工厂的哪个对象
    -->
    <bean id="my_monster01" class="com.hspedu.spring.factory.MyStaticFactory" factory-method="getMonster">
        <constructor-arg value="monster02"/>
    </bean>
2
3
4
5
6
7
8
9
10
//通过静态工厂获取 bean
    @Test
    public void getBeanByStaticFactory() {
        ApplicationContext ioc = new ClassPathXmlApplicationContext("beans.xml");
        Monster my_monster01 = ioc.getBean("my_monster01", Monster.class);
        System.out.println("my_monster01 = " + my_monster01);
    }
2
3
4
5
6
7
# 2.2.11 通过实例工厂配置 Bean 对象
# 2.2.11.1 说明
在 Spring 的 ioc 容器中,可以通过实例工厂获取 bean 对象
# 2.2.11.2 代码实现
//实例工厂类
public class MyInstanceFactory {
    private Map<String, Monster> monster_map;
    //通过普通代码块进行初始化
    {
        monster_map = new HashMap<>();
        monster_map.put("monster03", new Monster(300, "牛魔王", "芭蕉扇"));
        monster_map.put("monster04", new Monster(400, "狐狸精", "美人计"));
    }

    //写一个方法返回 Monster 对象
    public Monster getMonster(String key) {
        return monster_map.get(key);
    }
}
2
3
4
5
6
7
8
9
10
11
12
13
14
15
<!--配置实例工厂对象-->
    <bean class="com.hspedu.spring.factory.MyInstanceFactory" id="myInstanceFactory"/>
    <!--通过实例工厂配置 monster 对象-->
    <!--
        (1) factory-bean 指定使用哪个实例工厂对象返回 bean 对象
        (2) factory-method 指定使用实例工厂对象的哪个方法返回 bean
        (3) constructor-arg value="monster03" 指定获取到实例工厂中的哪个 monster
    -->
    <bean id="my_monster02" factory-bean="myInstanceFactory" factory-method="getMonster">
        <constructor-arg value="monster03"/>
    </bean>
2
3
4
5
6
7
8
9
10
11
//通过实例工厂获取 bean
    @Test
    public void getBeanByInstanceFactory() {
        ApplicationContext ioc = new ClassPathXmlApplicationContext("beans.xml");
        Monster my_monster02 = ioc.getBean("my_monster02", Monster.class);
        System.out.println("my_monster02 = " + my_monster02);
    }
2
3
4
5
6
7
# 2.2.12 通过 FactoryBean 配置 Bean 对象
# 2.2.12.1 说明
在 Spring 的 ioc 的容器中,通过 FactoryBean 获取 Bean 对象
# 2.2.12.2 代码实现
//这是一个 FactoryBean
public class MyFactoryBean implements FactoryBean<Monster> {
    //这个就是配置的时候,指定要获取的对象对应的 key
    private String key;
    private Map<String, Monster> monster_map;

    //代码块,完成初始化
    {
        monster_map = new HashMap<>();
        monster_map.put("monster03", new Monster(100, "牛魔王", "芭蕉扇"));
        monster_map.put("monster04", new Monster(200, "狐狸精啦啦啦", "美人计"));
    }

    public void setKey(String key) {
        this.key = key;
    }

    @Override
    public Monster getObject() throws Exception {
        return monster_map.get(key);
    }

    @Override
    public Class<?> getObjectType() {
        return Monster.class;
    }

    //这个方法判断是不是单例对象,默认返回 false,则每次都是一个新的对象
    @Override
    public boolean isSingleton() {
        return true;
    }
}
2
3
4
5
6
7
8
9
10
11
12
13
14
15
16
17
18
19
20
21
22
23
24
25
26
27
28
29
30
31
32
33
<!--通过 FactoryBean 获取配置 monster 对象-->
    <!--
        (1) class 指定使用的 FactoryBean
        (2) key 表示就是 MyFactoryBean 的属性 key
        (3) value 就是你要获取的对象对应的 key
    -->
    <bean id="my_monster05" class="com.hspedu.spring.factory.MyFactoryBean">
        <property name="key" value="monster04"/>
    </bean>
2
3
4
5
6
7
8
9
//通过 FactoryBean 获取 bean
    @Test
    public void getBeanByFactoryBean() {
        ApplicationContext ioc = new ClassPathXmlApplicationContext("beans.xml");
        Monster myMonster05 = ioc.getBean("my_monster05", Monster.class);
        System.out.println("myMonster05 = " + myMonster05);
    }
2
3
4
5
6
7
# 2.2.13 Bean 配置信息重用(继承)
# 2.2.13.1 说明
在 Spring 的 ioc 的容器中,提供了一种继承的方式来实现 bean 配置信息的重用
# 2.2.13.2 代码实现
<!--配置 Monster 对象-->
    <bean id="monster10" class="com.hspedu.spring.bean.Monster">
        <property name="monsterId" value="10"/>
        <property name="name" value="蜈蚣精"/>
        <property name="skill" value="蜇人"/>
    </bean>

    <!--
        如果还有一个 Monster 对象实例,内容和 monster10 的一致,笨方法是复制粘贴一份
        好方法是使用继承,parent="monster10" 表示指定当前这个配置的对象的属性从 id=monster10 中继承而来
    -->
    <bean id="monster11" class="com.hspedu.spring.bean.Monster" parent="monster10"/>

    <!--配置 Monster 对象-->
    <!--
        (1) 如果 bean 指定了 abstract="true", 表示该 bean 对象是专门用于被继承的
        (2) 本身这个 bean 就不能被获取/实例化
    -->
    <bean id="monster12" class="com.hspedu.spring.bean.Monster" abstract="true">
        <property name="monsterId" value="100"/>
        <property name="name" value="蜈蚣精~"/>
        <property name="skill" value="蜇人~"/>
    </bean>

    <bean id="monster13" class="com.hspedu.spring.bean.Monster" parent="monster12"/>
2
3
4
5
6
7
8
9
10
11
12
13
14
15
16
17
18
19
20
21
22
23
24
25
//通过继承获取 bean
    @Test
    public void getBeanByExtends() {
        ApplicationContext ioc = new ClassPathXmlApplicationContext("beans.xml");
        Monster monster11 = ioc.getBean("monster11", Monster.class);
        System.out.println("monster11 = " + monster11);

        Monster monster13 = ioc.getBean("monster13", Monster.class);
        System.out.println("monster13 = " + monster13);
    }
2
3
4
5
6
7
8
9
10
# 2.2.14 Bean 创建顺序
# 2.2.14.1 说明
(1)在 Spring 的 ioc 容器中,默认是按照配置的顺序创建 bean 的对象
比如有:
<bean id="student01" class="com.hspedu.bean.Student"/>
<bean id="department01" class="com.hspedu.bean.Department"/>
2
会先创建 student01 这个 bean 对象,然后创建 department01 这个 bean 对象
代码实现:
public class Student {
    public Student() {
        System.out.println("Student()构造器被执行...");
    }
}
2
3
4
5
public class Department {
    public Department() {
        System.out.println("Department() 被执行...");
    }
}
2
3
4
5
<!--测试 bean 对象的创建顺序-->
    <bean id="student01" class="com.hspedu.spring.bean.Student"/>
    <bean id="department01" class="com.hspedu.spring.bean.Department"/>
2
3
//测试 Bean 创建顺序
    @Test
    public void testBeanByCreate() {
        ApplicationContext ioc = new ClassPathXmlApplicationContext("beans.xml");
        System.out.println("ok");
    }
2
3
4
5
6
这里运行代码会输出:
Student()构造器被执行...
Department() 被执行...
ok
2
3
由此看出其顺序
(2)如果这样配置
<bean id="student01" class="com.hspedu.bean.Student" depends-on="department01"/>
<bean id="department01" class="com.hspedu.bean.Department"/>
2
会先创建 department01 对象,再创建 student01 对象
代码实现:
<!--测试 bean 对象的创建顺序-->
<!-- depends-on="department01" 表示 student01 要依赖于 department01 -->
    <bean id="student01" class="com.hspedu.spring.bean.Student" depends-on="department01"/>
    <bean id="department01" class="com.hspedu.spring.bean.Department"/>
2
3
4
这里运行代码会输出:
Department() 被执行...
Student()构造器被执行...
ok
2
3
由此看出其顺序
# 2.2.14.2 提出问题
(1)先分析下面两个 bean 创建的顺序是什么?
<!--配置 MemberDAOImpl 对象-->
<bean class="com.hspedu.spring.dao.MemberDAOImpl" id="memberDAOImpl"/>

<!--配置 MemberServiceImpl 对象-->
<bean class="com.hspedu.spring.service.MemberServiceImpl" id="memberServiceImpl">
    <property name="memberDAO" ref="memberDAOImpl"/>
</bean>
2
3
4
5
6
7
1)先创建 id=memberDAOImpl
2)再创建 id=memberServiceImpl
3)调用 MemberServiceImpl.setMemberDAO() 完成引用
(2)再看下面这两个 bean 的创建顺序是什么?
<!--配置 MemberServiceImpl 对象-->
<bean class="com.hspedu.spring.service.MemberServiceImpl" id="memberServiceImpl">
    <property name="memberDAO" ref="memberDAOImpl"/>
</bean>

<!--配置 MemberDAOImpl 对象-->
<bean class="com.hspedu.spring.dao.MemberDAOImpl" id="memberDAOImpl"/>
2
3
4
5
6
7
1)先创建 id=memberServiceImpl
2)再创建 id=memberDAOImpl
3)用 memberServiceImpl.setMemberDAO() 完成引用
# 2.2.15 bean 对象的单例和多例
# 2.2.15.1 说明
在 Spring 的 ioc 的容器中,在默认的情况下是按照单例创建对象的,即配置一个 bean 对象后,ioc 容器只会创建一个 bean 实例。如果我们希望 ioc 容器配置的某个 bean 对象是以多个实例形式创建的,则可以通过配置 scope="prototype" 来指定
# 2.2.15.2 代码实现
public class Cat {
    private Integer id;
    private String name;

    public Cat() {
        System.out.println("Cat() 被执行...");
    }

    public Integer getId() {
        return id;
    }

    public void setId(Integer id) {
        this.id = id;
    }

    public String getName() {
        return name;
    }

    public void setName(String name) {
        this.name = name;
    }
}
2
3
4
5
6
7
8
9
10
11
12
13
14
15
16
17
18
19
20
21
22
23
24
<!--配置 Cat 对象-->
    <!--
        (1) 在默认情况下 scope 属性值是 singleton
        (2) 此时在 ioc 的容器中,只有一个这个 bean 对象
        (3) 也就是说当执行 ioc.getBean 时,返回的是同一个对象
        (4) 如果希望每次返回一个新的 bean 的对象,则可以指定 scope 的属性值是 prototype
    -->
    <bean id="cat" class="com.hspedu.spring.bean.Cat">
        <property name="id" value="100"/>
        <property name="name" value="小花猫"/>
    </bean>
2
3
4
5
6
7
8
9
10
11
//测试 Scope
    @Test
    public void testBeanScope() {
        ApplicationContext ioc = new ClassPathXmlApplicationContext("beans.xml");
        Cat cat = ioc.getBean("cat", Cat.class);
        Cat cat2 = ioc.getBean("cat", Cat.class);
        Cat cat3 = ioc.getBean("cat", Cat.class);
        System.out.println("cat = " + cat);
        System.out.println("cat2 = " + cat2);
        System.out.println("cat3 = " + cat3);
    }
2
3
4
5
6
7
8
9
10
11
输出:
Cat() 被执行...
cat = com.hspedu.spring.bean.Cat@58fdd99
cat2 = com.hspedu.spring.bean.Cat@58fdd99
cat3 = com.hspedu.spring.bean.Cat@58fdd99
2
3
4
<bean id="cat" class="com.hspedu.spring.bean.Cat" scope="prototype">
        <property name="id" value="100"/>
        <property name="name" value="小花猫"/>
    </bean>
2
3
4
输出:
Cat() 被执行...
Cat() 被执行...
Cat() 被执行...
cat = com.hspedu.spring.bean.Cat@6b1274d2
cat2 = com.hspedu.spring.bean.Cat@7bc1a03d
cat3 = com.hspedu.spring.bean.Cat@70b0b186
2
3
4
5
6
# 2.2.15.3 使用细节
(1)默认是单例 singleton,在启动容器时,默认就会创建,并放入到 singletonObjects 集合
(2)当 <bean scope="prototype"> 设置为多实例机制后,该 bean 只有在调用 ioc.getBean 方法时才创建
(3)如果一个 bean 的配置既是单例的,又是懒加载,这时的 ioc 容器就不会提前创建该对象,而是当执行 ioc.getBean 方法的时候才会创建对象
懒加载也被叫作延迟价值,它的核心思想是把对象的实例化延迟到真正调用该对象的时候,这样做的好处是可以减轻大量对象在实例化时对资源的消耗,而不是在程序初始化的时候就预先将对象实例化。另外懒加载可以将对象的实例化代码从初始化方法中独立出来,从而提高代码的可读性,以便于代码能够更好地组织。
(4)通常情况下,lazy-init 就使用默认值 false,在开发看来,用空间换时间是值得的
(5)如果 scope="prototype" 这时你的 lazy-init 属性的值不管是 true 还是 false,都是在 ioc.getBean 的时候才创建对象
# 2.2.16 Bean 的生命周期
# 2.2.16.1 说明
Bean 对象的创建是由 JVM 完成的,然后执行如下方法:
1)执行构造器
2)执行 set 相关方法
3)调用 Bean 的初始化的方法(需要配置)
4)使用 Bean
5)当容器关闭的时候,调用 Bean 的销毁方法(需要配置)
# 2.2.16.2 代码实现
House 类
public class House {
    private String name;

    public House() {
        System.out.println("House() 构造器...");
    }

    public String getName() {
        return name;
    }

    public void setName(String name) {
        System.out.println("House setName() = " + name);
        this.name = name;
    }

    //这个方法是程序员来编写的
    //根据自己的业务逻辑来写
    public void init() {
        System.out.println("House init()...");
    }

    //这个方法是程序员来编写的
    //根据自己的业务逻辑来写
    public void destroy() {
        System.out.println("House destroy()...");
    }
}
2
3
4
5
6
7
8
9
10
11
12
13
14
15
16
17
18
19
20
21
22
23
24
25
26
27
28
<!--配置 House 对象,演示整个 Bean 的生命周期
        可以指定 bean 初始化时执行哪个方法,可以指定 bean 销毁时执行哪个方法
        (1) init-method="init" 指定 bean 的初始化方法为 House 类中的 init() 方法,初始化方法在 setter 方法后执行
        (2) init 方法执行的时机,由 Spring 容器来控制
        (3) destroy-method="destroy" 指定 bean 的销毁方法,在容器关闭的时候执行
        (4) destroy 方法执行的时机,由 Spring 容器来控制
    -->
    <bean class="com.hspedu.spring.bean.House" id="house"
          init-method="init"
          destroy-method="destroy">
        <property name="name" value="北京豪宅"/>
    </bean>
2
3
4
5
6
7
8
9
10
11
12
//测试 Bean 的生命周期
    @Test
    public void testBeanLife() {
        ApplicationContext ioc = new ClassPathXmlApplicationContext("beans.xml");
        House house = ioc.getBean("house", House.class);
        System.out.println("使用 house = " + house);

        //关闭容器
        //(1) ioc 的编译类型是 ApplicationContext,运行类型是 ClassPathXmlApplicationContext
        //(2) 因为 ClassPathXmlApplicationContext 实现了 ConfigurableApplicationContext, ClassPathXmlApplicationContext 有 close 方法
        //(3) 所以将 ioc 转成 ClassPathXmlApplicationContext 再调用 close
        //(4) 这里 close 方法调用我们自己配置的 destroy 方法
        ((ConfigurableApplicationContext) ioc).close();
    }
2
3
4
5
6
7
8
9
10
11
12
13
14
输出:
House() 构造器...
House setName() = 北京豪宅
House init()...
使用 house = com.hspedu.spring.bean.House@70b0b186
House destroy()...
2
3
4
5
# 2.2.17 配置 Bean 的后置处理器
# 2.2.17.1 说明
(1)在 Spring 的 ioc 容器中,可以配置 Bean 的后置处理器
(2)该处理器会在 bean 初始化方法调用前和初始化方法调用后被调用
(3)程序员可以在后置处理器中编写自己的代码
# 2.2.17.2 代码实现
public class House {
    private String name;

    public House() {
        System.out.println("House() 构造器...");
    }

    public String getName() {
        return name;
    }

    public void setName(String name) {
        System.out.println("House setName() = " + name);
        this.name = name;
    }

    //这个方法是程序员来编写的
    //根据自己的业务逻辑来写
    public void init() {
        System.out.println("House init()...");
    }

    //这个方法是程序员来编写的
    //根据自己的业务逻辑来写
    public void destroy() {
        System.out.println("House destroy()...");
    }

    @Override
    public String toString() {
        return "House{" +
                "name='" + name + '\'' +
                '}';
    }
}
2
3
4
5
6
7
8
9
10
11
12
13
14
15
16
17
18
19
20
21
22
23
24
25
26
27
28
29
30
31
32
33
34
35
public class MyBeanPostProcessor implements BeanPostProcessor {
    /**
     * 什么时候被调用? 在 Bean 的 init 方法前被调用
     * bean: 传入的是在 ioc 容器中创建/配置的 Bean
     * beanName: 传入的是在 ioc 容器中创建/配置的 Bean 的 Id
     * */
    @Override
    public Object postProcessBeforeInitialization(Object bean, String beanName) throws BeansException {
        System.out.println("postProcessBeforeInitialization().. bean = " + bean + " beanName = " + beanName);
        return bean;
    }

    /**
     * 什么时候被调用? 在 Bean 的 init 方法后被调用
     * bean: 传入的是在 ioc 容器中创建/配置的 Bean
     * beanName: 传入的是在 ioc 容器中创建/配置的 Bean 的 Id
     * */
    @Override
    public Object postProcessAfterInitialization(Object bean, String beanName) throws BeansException {
        System.out.println("postProcessAfterInitialization().. bean = " + bean + " beanName = " + beanName);
        return bean;
    }
}
2
3
4
5
6
7
8
9
10
11
12
13
14
15
16
17
18
19
20
21
22
23
<!--配置 House 对象-->
    <bean class="com.hspedu.spring.bean.House" id="house"
          init-method="init"
          destroy-method="destroy">
        <property name="name" value="大豪宅"/>
    </bean>

    <!--配置后置处理器对象
        (1) 当我们在 beans02.xml 容器配置文件,配置了 MyBeanPostProcessor
        (2) 这时后置处理器对象就会作用在该容器创建的 Bean 对象中
    -->
    <bean class="com.hspedu.spring.bean.MyBeanPostProcessor" id="myBeanPostProcessor"></bean>
2
3
4
5
6
7
8
9
10
11
12
//测试 Bean 的生命周期
    @Test
    public void testBeanPostProcessor() {
        ApplicationContext ioc = new ClassPathXmlApplicationContext("beans02.xml");
        House house = ioc.getBean("house", House.class);
        System.out.println("使用 house = " + house);

        //关闭容器
        //(1) ioc 的编译类型是 ApplicationContext,运行类型是 ClassPathXmlApplicationContext
        //(2) 因为 ClassPathXmlApplicationContext 实现了 ConfigurableApplicationContext, ClassPathXmlApplicationContext 有 close 方法
        //(3) 所以将 ioc 转成 ClassPathXmlApplicationContext 再调用 close
        ((ConfigurableApplicationContext) ioc).close();
    }
2
3
4
5
6
7
8
9
10
11
12
13
House() 构造器...
House setName() = 大豪宅
postProcessBeforeInitialization().. bean = House{name='大豪宅'} beanName = house
House init()...
postProcessAfterInitialization().. bean = House{name='大豪宅'} beanName = house
使用 house = House{name='大豪宅'}
House destroy()...
2
3
4
5
6
7
# 2.2.17.3 后置处理器的其它说明
(1)怎么执行到这个方法?
使用 AOP(反射 + 动态代理 + IO + 容器 + 注解)
(2)有什么用?
可以对 IOC 容器中所有的对象进行统一处理,比如日志处理/权限的校验/安全的验证/事务管理
(3)针对容器的所有对象吗?
是的,符合切面编程的特点
# 2.2.18 通过属性文件给 Bean 注入值
# 2.2.18.1 说明
在 Spring 的 ioc 容器中,可以通过属性文件给 bean 注入值
# 2.2.18.2 代码实现
monsterId=1000
name=jack
skill=hello
2
3
<!--指定属性文件
        location="classpath:my.properties"
        需要带上 classpath 否则不知道去哪读文件
    -->
    <context:property-placeholder location="classpath:my.properties"/>

    <!--配置 Monster 对象
        通过属性文件给 monster 对象的属性赋值
        这时属性值可以通过 ${属性名} 获取
        这里说的属性名就是 my.properties 文件中的 K=V 的 K
    -->
    <bean class="com.hspedu.spring.bean.Monster" id="monster1000">
        <property name="monsterId" value="${monsterId}"/>
        <property name="skill" value="${skill}"/>
        <property name="name" value="${name}"/>
    </bean>
2
3
4
5
6
7
8
9
10
11
12
13
14
15
16
//通过属性文件给 bean 属性赋值
    @Test
    public void setBeanByFile() {
        ApplicationContext ioc = new ClassPathXmlApplicationContext("beans03.xml");
        Monster monster1000 = ioc.getBean("monster1000", Monster.class);
        System.out.println("monster1000 = " + monster1000);
    }
2
3
4
5
6
7
如果属性配置文件中有中文,需要将其转为 Unicode 编码进行配置
# 2.2.19 基于 XML 的 bean 的自动装配
# 2.2.19.1 说明
在 Spring 的 ioc 容器中,可以实现自动装配 bean
# 2.2.19.2 代码实现
//DAO 类
public class OrderDAO {
    public void saveOrder() {
        System.out.println("保存一个订单...");
    }
}
2
3
4
5
6
//Service 类
public class OrderService {
    //OrderDAO 属性
    private OrderDAO orderDAO;

    public OrderDAO getOrderDAO() {
        return orderDAO;
    }

    public void setOrderDAO(OrderDAO orderDAO) {
        this.orderDAO = orderDAO;
    }
}
2
3
4
5
6
7
8
9
10
11
12
13
public class OrderServlet {
    private OrderService orderService;

    public OrderService getOrderService() {
        return orderService;
    }

    public void setOrderService(OrderService orderService) {
        this.orderService = orderService;
    }
}
2
3
4
5
6
7
8
9
10
11
通过 byType 方式自动装配
<!--配置 OrderDAO 对象-->
    <bean class="com.hspedu.spring.dao.OrderDAO" id="orderDAO"/>
    <!--配置 OrderService 对象
        (1) autowire="byType" 表示在创建 OrderService 时
            通过类型的方式给对象的属性自动完成赋值或引用
        (2) 比如 OrderService 对象有 private OrderDAO orderDAO 的属性,那么就会自动在容器中去找有没有 OrderDAO 类型的对象
        (3) 如果有,就会自动的装配,如果是按照 byType 的方式来装配,那么这个容器中不能存在两个相同类型的对象
    -->
    <bean autowire="byType" class="com.hspedu.spring.service.OrderService" id="orderService"/>
    <!--配置 OrderServlet 对象-->
    <bean autowire="byType" class="com.hspedu.spring.Servlet.OrderServlet" id="orderServlet"/>
2
3
4
5
6
7
8
9
10
11
通过 byName 方式自动装配
<!--配置 OrderDAO 对象-->
    <bean class="com.hspedu.spring.dao.OrderDAO" id="orderDAO"/>
    <!--配置 OrderService 对象
        (1) autowire="byType" 表示在创建 OrderService 时
            通过类型的方式给对象的属性自动完成赋值或引用
        (2) 比如 OrderService 对象有 private OrderDAO orderDAO 的属性,那么就会自动在容器中去找有没有 OrderDAO 类型的对象
        (3) 如果有,就会自动的装配,如果是按照 byType 的方式来装配,那么这个容器中不能存在两个相同类型的对象

        (4) 如果设置的是 autowire="byName" 表示是通过名字来完成自动装配
        (5) 比如: autowire="byName" class="com.hspedu.spring.service.OrderService"
            1) 先看 OrderService 里有个属性 private OrderDAO orderDAO,那么就是给这个 orderDAO 完成自动装配,通过 byName 的方式的话就是要从 OrderService 类中通过 setter 方法来找到类名,此时找到有个 setOrderDAO 的方法名,这时就会把 set 去掉把首字母小写后获得 orderDAO,这时再去 ioc 容器中根据 id 查找是否有符合此 id 的类,这里就找有没有 id 是 orderDAO 的,有则自动装配,没有则报错
    -->
    <bean autowire="byName" class="com.hspedu.spring.service.OrderService" id="orderService"/>
    <!--配置 OrderServlet 对象-->
    <bean autowire="byName" class="com.hspedu.spring.Servlet.OrderServlet" id="orderServlet"/>
2
3
4
5
6
7
8
9
10
11
12
13
14
15
public void setBeanByAutowire() {
        ApplicationContext ioc = new ClassPathXmlApplicationContext("beans03.xml");
        OrderServlet orderServlet = ioc.getBean("orderServlet", OrderServlet.class);
        //验证是否自动装配上 OrderService
        System.out.println(orderServlet.getOrderService());
        //验证是否自动装配上 OrderDAO
        System.out.println(orderServlet.getOrderService().getOrderDAO());
        System.out.println("orderServlet = " + orderServlet);
    }
2
3
4
5
6
7
8
9
# 2.2.20 Spring el 表达式
# 2.2.20.1 说明
(1)Spring Expression Language 是 Spring 的表达式语言,简称 SpEL。支持运行时查询并可以操作对象
(2)和 EL 表达式一样,SpEL 根据 JavaBean 风格的 getXxx()、setXxx() 方法定义的属性访问对象
(3)SpEL 使用 #{...} 作为定界符,所有在大括号中的字符都将被认为是 SpEL 表达式
# 2.2.20.2 代码实现
public class SpELBean {
    private String name;
    private Monster monster;
    private String monsterName;
    private String crySound;
    private String bookName;
    private Double result;

    public SpELBean() {
    }

    public String getName() {
        return name;
    }

    public void setName(String name) {
        this.name = name;
    }

    public Monster getMonster() {
        return monster;
    }

    public void setMonster(Monster monster) {
        this.monster = monster;
    }

    public String getMonsterName() {
        return monsterName;
    }

    public void setMonsterName(String monsterName) {
        this.monsterName = monsterName;
    }

    public String getCrySound() {
        return crySound;
    }

    public void setCrySound(String crySound) {
        this.crySound = crySound;
    }

    public String getBookName() {
        return bookName;
    }

    public void setBookName(String bookName) {
        this.bookName = bookName;
    }

    public Double getResult() {
        return result;
    }

    public void setResult(Double result) {
        this.result = result;
    }

    @Override
    public String toString() {
        return "SpELBean{" +
                "name='" + name + '\'' +
                ", monster=" + monster +
                ", monsterName='" + monsterName + '\'' +
                ", crySound='" + crySound + '\'' +
                ", bookName='" + bookName + '\'' +
                ", result=" + result +
                '}';
    }
}
2
3
4
5
6
7
8
9
10
11
12
13
14
15
16
17
18
19
20
21
22
23
24
25
26
27
28
29
30
31
32
33
34
35
36
37
38
39
40
41
42
43
44
45
46
47
48
49
50
51
52
53
54
55
56
57
58
59
60
61
62
63
64
65
66
67
68
69
70
71
<!--spring el 表达式的使用-->
    <!--通过 spel 给 bean 的属性赋值-->
    <bean id="spELBean" class="com.hspedu.spring.bean.SpELBean">
        <!--spel 给字面量-->
        <property name="name" value="止束"/>
        <!--spel 引用其它 bean-->
        <property name="monster" value="#{monster01}"/>
        <!--spel 引用其它 bean 的属性值-->
        <property name="monsterName" value="#{monster02.name}"/>
        <!--spel 调用普通方法赋值-->
        <property name="crySound" value="#{spELBean.cry('喵喵的...')}"/>
        <!--spel 调用静态方法赋值-->
        <property name="bookName" value="#{T(com.hspedu.spring.bean.SpELBean).read('天龙八部')}"/>
        <!--spel 通过运算赋值-->
        <property name="result" value="#{89*1.2}"/>
    </bean>
2
3
4
5
6
7
8
9
10
11
12
13
14
15
16
public void setBeanBySpel() {
        ApplicationContext ioc = new ClassPathXmlApplicationContext("beans04.xml");
        SpELBean spELBean = ioc.getBean("spELBean", SpELBean.class);
        System.out.println("spELBean = " + spELBean);
    }
2
3
4
5
# 第 3 章 基于注解配置 bean
# 3.1 基本使用
# 3.1.1 说明
(1)基于注解的方式配置 bean,主要是项目开发中的组件,比如 Controller、Service 和 DAO
(2)组件注解的形式有:
1)@Component 表示当前注解标识的是一个组件
2)@Controller 表示当前注解标识的是一个控制器,通常用于 Servlet
3)@Service 表示当前注解标识的是一个处理业务逻辑的类,通常用于 Service 类
4)@Repository 表示当前注解标识的是一个持久化层的类,通常用于 DAO 类
# 3.1.2 快速入门
# 3.1.2.1 应用实例
使用注解的方式来配置 Controller、Service、Respository、Component
# 3.1.2.2 代码实现
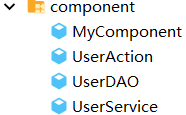
(1)引入 spring-aop-5.3.8.jar,在 spring 的 libs 的目录下拷贝即可
UserDAO
//使用 @Repository 标识该类是一个 DAO 类,是一个持久化层的类/对象
@Repository
public class UserDAO {
}
2
3
4
UserService
//@Service 标识该类是一个 Service 类/对象
@Service
public class UserService {
}
2
3
4
UserAction
//@Controller 标识该类是一个控制器,通常这个类是一个 Servlet
@Controller
public class UserAction {
}
2
3
4
MyComponent
//@Component 标识该类是一个组件,是一个通用的注解
@Component
public class MyComponent {
}
2
3
4
<!--配置容器要扫描的包
        (1) component-scan 要对指定包下的类进行扫描,并创建对象到容器中
        (2) base-package 指定要扫描的包
        (3) 含义是当 spring 容器创建/初始化时,就会扫描 com.hspedu.spring.component 包下的所有的有 @Controller / @Service / @Respository / @Component 注解的类并将其实例化,生成对象放入到 ioc 容器中
    -->
    <context:component-scan base-package="com.hspedu.spring.component"/>
2
3
4
5
6
//通过注解来配置 Bean
    @Test
    public void setBeanByAnnotation() {
        ApplicationContext ioc = new ClassPathXmlApplicationContext("beans05.xml");

        UserDAO userDAO = ioc.getBean(UserDAO.class);
        UserService userService = ioc.getBean(UserService.class);
        UserAction userAction = ioc.getBean(UserAction.class);
        MyComponent myComponent = ioc.getBean(MyComponent.class);

        System.out.println("userDAO = " + userDAO);
        System.out.println("userService = " + userService);
        System.out.println("userAction = " + userAction);
        System.out.println("myComponent = " + myComponent);

        System.out.println("ok");
    }
2
3
4
5
6
7
8
9
10
11
12
13
14
15
16
17
# 3.1.2.3 注意事项和细节说明
(1)需要导入 spring-aop-5.3.8.jar
(2)必须在 Spring 配置文件中指定自动扫描的包,IOC 容器才能够检测到当前项目中哪些类被标识了注解,注意要导入 context 的名称空间
<!--配置自动扫描的包-->
<context:component-scan base-package="com.hspedu.spring.component"/>
2
可以使用通配符 * 来指定,比如 com.hspedu.spring.* 表示
com.hspedu.spring.component 也会去扫描它的子包里的类
(3)Spring 的 IOC 容器不能检测一个使用了 @Controller 注解的类到底是不是一个真正的控制器,注解的名称是用于程序员自己识别当前标识的是什么组件,其它的像 @Service、@Repository 也是一样的道理[也就是说 spring 的 IOC 容器只要检查到注解就会生成对象,但是这个注解的含义 spring 不会识别,注解是给程序员编程方便看的]
(4)<context:component-scan base-package="com.hspedu.spring.component" resource-pattern="User*.class"/> 其中 resource-pattern="User*.class" 表示只扫描满足类的名字的开头是 User 的类
(5)如果希望排除某个包或者子包下的某个类被扫描,可以通过指定以某种类型的注解的方式进行过滤,通过 exclude-filter 来指定
<!--
        context:exclude-filter type="annotation" 指定要排除哪些类,type 指定排除的方式,annotation 表示按照注解的方式来排除
        expression="org.springframework.stereotype.Service" 用来指定要排除的注解的全路径
    -->
    <context:component-scan base-package="com.hspedu.spring.component">
        <context:exclude-filter type="annotation" expression="org.springframework.stereotype.Service"/>
        <context:exclude-filter type="annotation" expression="org.springframework.stereotype.Repository"/>
    </context:component-scan>
2
3
4
5
6
7
8
(6)指定自动扫描哪些注解类
<!-- 如果希望按照自己的规则来扫描包或者子包下的某些注解,可以通过 include-filter 来指定
        (1) use-default-filters="false" 表示不使用默认的过滤机制/扫描机制
        (2) context:include-filter 表示要去扫描哪些类
        (3) type="annotation" 按照注解的方式来扫描/过滤
        (4) expression="org.springframework.stereotype.Service" 指定要扫描的注解的全路径
    -->
    <context:component-scan base-package="com.hspedu.spring.component" use-default-filters="false">
        <context:include-filter type="annotation" expression="org.springframework.stereotype.Service"/>
        <context:include-filter type="annotation" expression="org.springframework.stereotype.Controller"/>
    </context:component-scan>
2
3
4
5
6
7
8
9
10
(7)默认情况下标记注解后,id 的值为类名首字母小写,也可以使用注解的 value 属性指定 id 值,并且 value 可以省略
@Repository(value = "hspUserDAO")
public class UserDAO {
}
2
3
彻底弄懂@Controller 、@Service、@Component - 知乎 (zhihu.com) (opens new window)
# 3.2 手动开发简单的 Spring 基于注解配置的程序
# 3.2.1 需求说明
(1)自己写一个简单的 Spring 容器,通过读取类的注解(@Component,@Controller,@Service,@Repository),将对象注入到 IOC 容器
(2)也就是说,不使用 Spring 原生框架,我们自己使用 IO + Annotation + 反射 + 集合 技术实现,打通 Spring 注解方式开发的技术痛点
# 3.2.2 思路分析
(1)使用注解方式完成,这里不用 XML 来配置
(2)程序框架图
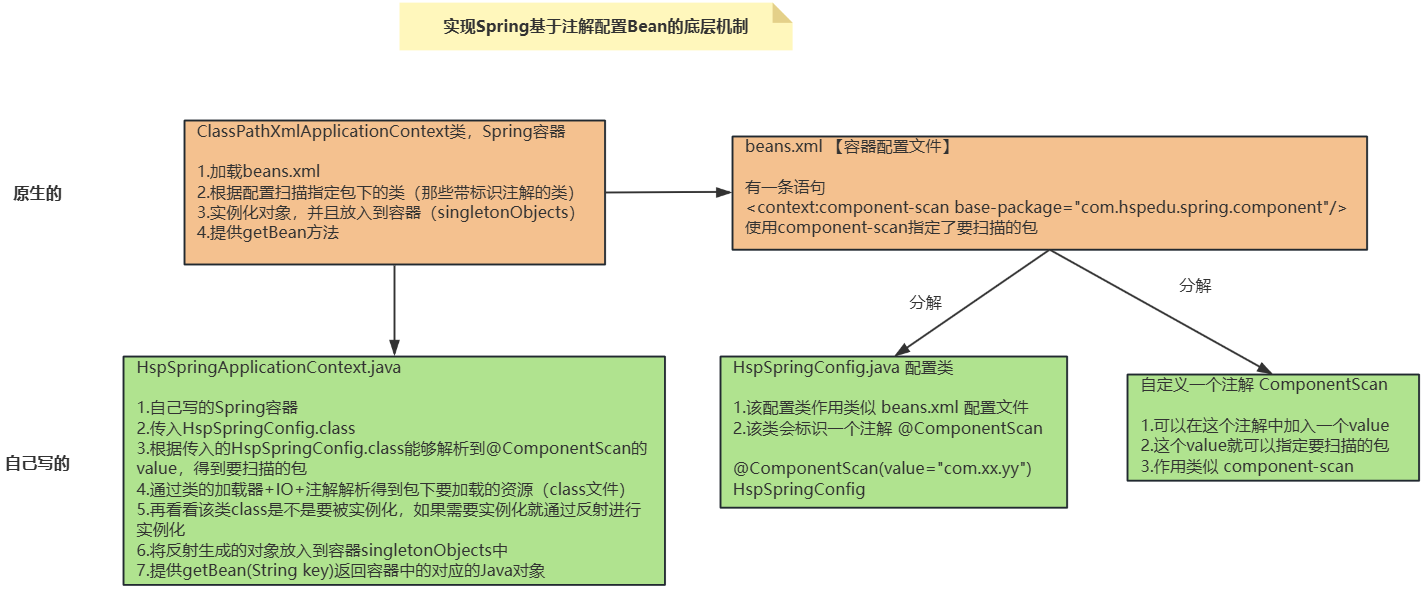
# 3.2.3 代码实现
# 3.2.3.1 搭建基本结构并获取扫描包
HspSpringConfig
/**
 * 这是一个配置类,作用类似我们原生 Spring 的 beans.xml 容器配置文件
 * */
@ComponentScan(value = "com.hspedu.spring.component")
public class HspSpringConfig {
}
2
3
4
5
6
ComponentScan
/**
 * (1) @Target(ElementType.TYPE) 指定我们的 ComponentScan 注解可以修饰 Type 程序元素,包括 class 等
 * (2) @Retention(RetentionPolicy.RUNTIME) 指定 ComponentScan 注解的保留范围
 * (3) String value() default ""; 表示 ComponentScan 可以传入 value
 * */
@Target(ElementType.TYPE)
@Retention(RetentionPolicy.RUNTIME)
public @interface ComponentScan {
    String value() default "";
}
2
3
4
5
6
7
8
9
10
HspSpringApplicationContext
/**
 * HspSpringApplicationContext 类的作用类似 Spring 原生 IOC 容器
 * */
public class HspSpringApplicationContext {
    private Class configClass;
    //ioc 存放的就是通过反射创建的对象(基于注解的方式)
    private final ConcurrentHashMap<String, Object> ioc = new ConcurrentHashMap<>();

    //构造器
    public HspSpringApplicationContext(Class configClass) {
        this.configClass = configClass;
        System.out.println("this.configClass = " + this.configClass); //this.configClass = class com.hspedu.spring.annotation.HspSpringConfig
        //获取注解信息,从注解信息里的 value 值中获取包的路径
        //1. 先得到 HspSpringConfig 配置的 @ComponentScan(value = "com.hspedu.spring.component")
        ComponentScan componentScan = (ComponentScan) this.configClass.getDeclaredAnnotation(ComponentScan.class);
        //2. 通过 componentScan 就可以得到 value 值,即要扫描的包
        String path = componentScan.value();
        System.out.println("要扫描的包 = " + path); // com.hspedu.spring.component
    }
}
2
3
4
5
6
7
8
9
10
11
12
13
14
15
16
17
18
19
20
# 3.2.3.2 获取扫描包下所有的 .class 文件
HspSpringApplicationContext
/**
 * HspSpringApplicationContext 类的作用类似 Spring 原生 IOC 容器
 * */
public class HspSpringApplicationContext {
    private Class configClass;
    //ioc 存放的就是通过反射创建的对象(基于注解的方式)
    private final ConcurrentHashMap<String, Object> ioc = new ConcurrentHashMap<>();

    //构造器
    public HspSpringApplicationContext(Class configClass) {
        this.configClass = configClass;
        System.out.println("this.configClass = " + this.configClass); //this.configClass = class com.hspedu.spring.annotation.HspSpringConfig
        //获取注解信息,从注解信息里的 value 值中获取包的路径
        //1. 先得到 HspSpringConfig 配置的 @ComponentScan(value = "com.hspedu.spring.component")
        ComponentScan componentScan = (ComponentScan) this.configClass.getDeclaredAnnotation(ComponentScan.class);
        //2. 通过 componentScan 就可以得到 value 值,即要扫描的包
        String path = componentScan.value();
        System.out.println("要扫描的包 = " + path); // com.hspedu.spring.component
        //3. 得到要扫描的包下的所有资源(.class 文件等,注意是在 out 目录下,而不是 src 下)
        //(1) 得到类的加载器
        ClassLoader classLoader = HspApplicationContext.class.getClassLoader();
        //(2) 通过类的加载器获取到要扫描的包的资源 url
        //因为类加载器加载包时的路径的写法是以 / 分隔,所以要把上面 path 中的 . 换成 / 例如:com/hspedu/spring/component
        path = path.replace(".", "/");
        URL resource = classLoader.getResource(path);
        System.out.println("resource = " + resource); //resource = file:/D:/Study/Code/IDEA/hspedu_spring/spring/out/production/spring/com/hspedu/spring/component
        //4. 将要加载的资源路径下的文件进行遍历
        File file = new File(resource.getFile());
        if (file.isDirectory()) { //判断是不是目录
            File[] files = file.listFiles(); //将该目录下的所有文件存放到数组中
            for (File f : files) {
                System.out.println("=============");
                System.out.println(f.getAbsolutePath()); //得到绝对路径
            }
        }
    }
}
2
3
4
5
6
7
8
9
10
11
12
13
14
15
16
17
18
19
20
21
22
23
24
25
26
27
28
29
30
31
32
33
34
35
36
37
# 3.2.3.3 获取全类名、反射对象、放入容器
HspSpringApplicationContext
/**
 * HspSpringApplicationContext 类的作用类似 Spring 原生 IOC 容器
 * */
public class HspSpringApplicationContext {
    private Class configClass;
    //ioc 存放的就是通过反射创建的对象(基于注解的方式)
    private final ConcurrentHashMap<String, Object> ioc = new ConcurrentHashMap<>();

    //构造器
    public HspSpringApplicationContext(Class configClass) {
        this.configClass = configClass;
        System.out.println("this.configClass = " + this.configClass); //this.configClass = class com.hspedu.spring.annotation.HspSpringConfig
        //获取注解信息,从注解信息里的 value 值中获取包的路径
        //1. 先得到 HspSpringConfig 配置的 @ComponentScan(value = "com.hspedu.spring.component")
        ComponentScan componentScan = (ComponentScan) this.configClass.getDeclaredAnnotation(ComponentScan.class);

        //2. 通过 componentScan 就可以得到 value 值,即要扫描的包
        String path = componentScan.value();
        System.out.println("要扫描的包 = " + path); // com.hspedu.spring.component

        //3. 得到要扫描的包下的所有资源(.class 文件等,注意是在 out 目录下,而不是 src 下)
        //(1) 得到类的加载器
        ClassLoader classLoader = HspApplicationContext.class.getClassLoader();
        //(2) 通过类的加载器获取到要扫描的包的资源 url
        //因为类加载器加载包时的路径的写法是以 / 分隔,所以要把上面 path 中的 . 换成 / 例如:com/hspedu/spring/component
        path = path.replace(".", "/");
        URL resource = classLoader.getResource(path);
        System.out.println("resource = " + resource); //resource = file:/D:/Study/Code/IDEA/hspedu_spring/spring/out/production/spring/com/hspedu/spring/component

        //4. 将要加载的资源路径下的文件进行遍历
        File file = new File(resource.getFile());
        if (file.isDirectory()) { //判断是不是目录
            File[] files = file.listFiles(); //将该目录下的所有文件存放到数组中
            for (File f : files) {
                System.out.println("=============");
                System.out.println(f.getAbsolutePath()); //得到绝对路径
                //5. 从绝对路径中获取全类名
                //从 D:\Study\Code\IDEA\hspedu_spring\spring\out\production\spring\com\hspedu\spring\component\MyComponent.class
                //获取到 com\hspedu\spring\component\MyComponent
                //并且要将 \ 换成 .
                //最终要得到 com.hspedu.spring.component.MyComponent
                String fileAbsolutePath = f.getAbsolutePath();
                //这里只处理后缀是 .class 的文件
                if (fileAbsolutePath.endsWith(".class")) {
                    //(1) 先获取到类名
                    String className = fileAbsolutePath.substring(fileAbsolutePath.lastIndexOf("\\") + 1, fileAbsolutePath.indexOf(".class"));
                    System.out.println("className = " + className);
                    //(2) 获取类的完整的路径(全类名)
                    String classFullName = path.replace("/", ".") + "." + className;
                    System.out.println("classFullName = " + classFullName);
                    //(3) 判断该类是不是需要注入到容器中,就看该类是不是含有这些注解:@Component @Service 等
                    try {
                        //通过类的全类名获得该类的类对象
                        /*
                        * Class.forName(classFullName) 和 classLoader.loadClass(classFullName) 的区别
                        * 两者都可以反射加载类,前者会调用类的静态方法,后者不会,所以前者更加完整,后者更加轻量
                        * */
                        Class<?> aClass = classLoader.loadClass(classFullName);
                        // aClass.isAnnotationPresent(Component.class) 用于判断该类是否含有 @Component 注解
                        if (aClass.isAnnotationPresent(Component.class) || aClass.isAnnotationPresent(Controller.class) || aClass.isAnnotationPresent(Service.class) || aClass.isAnnotationPresent(Repository.class)) {
                            //6. 这时就可以反射对象,并放入到容器中
                            Class<?> clazz = Class.forName(classFullName);
                            Object instance = clazz.newInstance();
                            //放入到容器中
                            //StringUtils.uncapitalize() 可以将类名首字母改成小写
                            ioc.put(StringUtils.uncapitalize(className), instance);
                        }
                    } catch (Exception e) {
                        throw new RuntimeException(e);
                    }
                }
            }
        }
    }

    //编写方法返回容器中的对象
    public Object getBean(String name) {
        return ioc.get(name);
    }
}
2
3
4
5
6
7
8
9
10
11
12
13
14
15
16
17
18
19
20
21
22
23
24
25
26
27
28
29
30
31
32
33
34
35
36
37
38
39
40
41
42
43
44
45
46
47
48
49
50
51
52
53
54
55
56
57
58
59
60
61
62
63
64
65
66
67
68
69
70
71
72
73
74
75
76
77
78
79
80
# 3.2.4 注意事项和细节说明
还可以通过 @Component(value = "xx") @Controller(value = "yy") @Service(value = "zz") 中指定的 value,给 bean 分配 id
//@Component 标识该类是一个组件,是一个通用的注解
@Component(value = "hsp1")
public class MyComponent {
}
2
3
4
/**
 * HspSpringApplicationContext 类的作用类似 Spring 原生 IOC 容器
 * */
public class HspSpringApplicationContext {
    private Class configClass;
    //ioc 存放的就是通过反射创建的对象(基于注解的方式)
    private final ConcurrentHashMap<String, Object> ioc = new ConcurrentHashMap<>();

    //构造器
    public HspSpringApplicationContext(Class configClass) {
        this.configClass = configClass;
        System.out.println("this.configClass = " + this.configClass); //this.configClass = class com.hspedu.spring.annotation.HspSpringConfig
        //获取注解信息,从注解信息里的 value 值中获取包的路径
        //1. 先得到 HspSpringConfig 配置的 @ComponentScan(value = "com.hspedu.spring.component")
        ComponentScan componentScan = (ComponentScan) this.configClass.getDeclaredAnnotation(ComponentScan.class);

        //2. 通过 componentScan 就可以得到 value 值,即要扫描的包
        String path = componentScan.value();
        System.out.println("要扫描的包 = " + path); // com.hspedu.spring.component

        //3. 得到要扫描的包下的所有资源(.class 文件等,注意是在 out 目录下,而不是 src 下)
        //(1) 得到类的加载器
        ClassLoader classLoader = HspApplicationContext.class.getClassLoader();
        //(2) 通过类的加载器获取到要扫描的包的资源 url
        //因为类加载器加载包时的路径的写法是以 / 分隔,所以要把上面 path 中的 . 换成 / 例如:com/hspedu/spring/component
        path = path.replace(".", "/");
        URL resource = classLoader.getResource(path);
        System.out.println("resource = " + resource); //resource = file:/D:/Study/Code/IDEA/hspedu_spring/spring/out/production/spring/com/hspedu/spring/component

        //4. 将要加载的资源路径下的文件进行遍历
        File file = new File(resource.getFile());
        if (file.isDirectory()) { //判断是不是目录
            File[] files = file.listFiles(); //将该目录下的所有文件存放到数组中
            for (File f : files) {
                System.out.println("=============");
                System.out.println(f.getAbsolutePath()); //得到绝对路径
                //5. 从绝对路径中获取全类名
                //从 D:\Study\Code\IDEA\hspedu_spring\spring\out\production\spring\com\hspedu\spring\component\MyComponent.class
                //获取到 com\hspedu\spring\component\MyComponent
                //并且要将 \ 换成 .
                //最终要得到 com.hspedu.spring.component.MyComponent
                String fileAbsolutePath = f.getAbsolutePath();
                //这里只处理后缀是 .class 的文件
                if (fileAbsolutePath.endsWith(".class")) {
                    //(1) 先获取到类名
                    String className = fileAbsolutePath.substring(fileAbsolutePath.lastIndexOf("\\") + 1, fileAbsolutePath.indexOf(".class"));
                    System.out.println("className = " + className);
                    //(2) 获取类的完整的路径(全类名)
                    String classFullName = path.replace("/", ".") + "." + className;
                    System.out.println("classFullName = " + classFullName);
                    //(3) 判断该类是不是需要注入到容器中,就看该类是不是含有这些注解:@Component @Service 等
                    try {
                        //通过类的全类名获得该类的类对象
                        /*
                        * Class.forName(classFullName) 和 classLoader.loadClass(classFullName) 的区别
                        * 两者都可以反射加载类,前者会调用类的静态方法,后者不会,所以前者更加完整,后者更加轻量
                        * */
                        Class<?> aClass = classLoader.loadClass(classFullName);
                        // aClass.isAnnotationPresent(Component.class) 用于判断该类是否含有 @Component 注解
                        if (aClass.isAnnotationPresent(Component.class) || aClass.isAnnotationPresent(Controller.class) || aClass.isAnnotationPresent(Service.class) || aClass.isAnnotationPresent(Repository.class)) {
                            //这里演示一个用 Component 注解指定 value 来当作 id 时,怎样取出这个 id
                            if (aClass.isAnnotationPresent(Component.class)) {
                                //获取到该注解
                                Component component = aClass.getDeclaredAnnotation(Component.class);
                                String id = component.value();
                                if (!"".endsWith(id)) {
                                    className = id; //替换
                                }
                            }

                            //6. 这时就可以反射对象,并放入到容器中
                            Class<?> clazz = Class.forName(classFullName);
                            Object instance = clazz.newInstance();
                            //放入到容器中
                            //StringUtils.uncapitalize() 可以将类名首字母改成小写
                            ioc.put(StringUtils.uncapitalize(className), instance);
                        }
                    } catch (Exception e) {
                        throw new RuntimeException(e);
                    }
                }
            }
        }
    }

    //编写方法返回容器中的对象
    public Object getBean(String name) {
        return ioc.get(name);
    }
}
2
3
4
5
6
7
8
9
10
11
12
13
14
15
16
17
18
19
20
21
22
23
24
25
26
27
28
29
30
31
32
33
34
35
36
37
38
39
40
41
42
43
44
45
46
47
48
49
50
51
52
53
54
55
56
57
58
59
60
61
62
63
64
65
66
67
68
69
70
71
72
73
74
75
76
77
78
79
80
81
82
83
84
85
86
87
88
89
90
# 3.3 自动装配
# 3.3.1 基本说明
(1)基于注解配置 bean,也可以实现自动装配,使用的注解是:@AutoWired 或者 @Resource
(2)@AutoWired 的规则说明
1)在 IOC 容器中查找待装配的组件的类型,如果有唯一的 bean 匹配,则使用该 bean 装配
2)如果待装配的类型对应的 bean 在 IOC 容器中有多个,则使用待装配的属性的属性名作为 id 值再进行查找,找到就装配,找不到就抛异常,例如:xml 文件中又配置了两个 UserService 类型的对象,id 分别为 userService200、userService300,而注解的方式又会创建一个,那么这时候就会根据 UserServlet 中定义的 UserService 的属性名进行装配,如果 UserServlet 定义的是 private UserService userService 则会装配注解创建的,因为通过注解方式创建的对象实例的 id 是类名首字母小写,如果 UserServlet 定义的是 private UserService userService200 则会装配 id 是 userService200 的实例,如果如果 UserServlet 定义的是 private UserService userService300 则会装配 id 是 userService300 的实例,如果如果 UserServlet 定义的是 private UserService userService400 则会报错
3)注意:假设只有一个 UserService 实例,是通过注解配置的,但是 UserServlet 中定义的是 private UserService userService400 此时不会报错,因为程序会从第一条规则通过,即在 IOC 容器中查找待装配的组件的类型,如果有唯一的 bean 匹配,则使用该 bean 装配,就不会管你定义的属性的名字是什么
beans06.xml
<?xml version="1.0" encoding="UTF-8"?>
<beans xmlns="http://www.springframework.org/schema/beans"
       xmlns:xsi="http://www.w3.org/2001/XMLSchema-instance"
       xmlns:context="http://www.springframework.org/schema/context"
       xsi:schemaLocation="http://www.springframework.org/schema/beans http://www.springframework.org/schema/beans/spring-beans.xsd http://www.springframework.org/schema/context https://www.springframework.org/schema/context/spring-context.xsd">

    <context:component-scan base-package="com.hspedu.spring.component"/>
</beans>
2
3
4
5
6
7
8
UserService
//@Service 标识该类是一个 Service 类/对象
@Service
public class UserService {
    public void hi() {
        System.out.println("UserService hi()~");
    }
}
2
3
4
5
6
7
UserAction
//@Controller 标识该类是一个控制器,通常这个类是一个 Servlet
@Controller
public class UserAction {
    @Autowired
    private UserService userService;
    public void sayOk() {
        System.out.println("UserAction 的 sayOk()");
        userService.hi();
    }
}
2
3
4
5
6
7
8
9
10
SpringBeanTest
@Test
    public void setProByAutowired() {
        ApplicationContext ioc = new ClassPathXmlApplicationContext("beans06.xml");
        UserAction userAction = ioc.getBean("userAction", UserAction.class);
        System.out.println("userAction = " + userAction);
        userAction.sayOk();
    }
2
3
4
5
6
7
(3)@Resource 的规则说明
1)@Resource 有两个属性是比较重要的,分别是 name 和 type,Spring 将 @Resource 注解的 name 属性解析为 bean 的名字,而 type 属性则解析为 bean 的类型,所以如果使用 name 属性,则使用 byName 的自动注入策略,而使用 type 属性时则使用 byType 自动注入策略
2)如果 @Resource 没有指定 name 和 type,则先使用 byName 注入策略,如果匹配不上,再使用 byType 策略,如果都不成功,就会报错
//@Controller 标识该类是一个控制器,通常这个类是一个 Servlet
@Controller
public class UserAction {
    //@Resource(name = "userService") //表示装配 id = userService 的对象
    @Resource(type = UserService.class)
    private UserService userService;
    public void sayOk() {
        System.out.println("UserAction 的 sayOk()");
        userService.hi();
    }
}
2
3
4
5
6
7
8
9
10
11
(4)不管是 @Autowire 还是 @Resource 都保证属性名是规范的写法就可以注入
# 3.3.2 注意事项和细节说明
(1)如待装配的类型对应的 bean 在 IOC 容器中有多个,则使用待装配的属性的属性名作为 id 值再进行查找,找到就装配,找不到就抛异常
(2)@Autowired 和 @Qualifier(value = "xxx") 可以一起使用,就可以指定属性名
# 3.4 泛型依赖注入
# 3.4.1 泛型依赖解释
(1)为了更好的管理有继承和相互依赖的 bean 的自动装配,Spring 还提供了基于泛型依赖的注入机制
(2)在继承关系复杂的情况下,泛型依赖注入就会有很大的优越性
# 3.4.2 应用实例
(1)各个类关系图
(2)传统方法是将 PhoneDAO / BookDAO 自动装配到 PhoneService / BookService 中,当这种继承关系多时,就比较麻烦,可以使用 Spring 提供的泛型依赖注入
3.4.3 代码实现
Book
public class Book {
}
2
Phone
public class Phone {
}
2
BaseDAO
//自定义的泛型类
public abstract class BaseDAO<T> {
    public abstract void save();
}
2
3
4
PhoneDAO
@Repository
public class PhoneDAO extends BaseDAO<Phone> {
    @Override
    public void save() {
        System.out.println("PhoneDAO save()");
    }
}
2
3
4
5
6
7
BookDAO
@Repository
public class BookDAO extends BaseDAO<Book> {
    @Override
    public void save() {
        System.out.println("BookDAO 的 save 方法");
    }
}
2
3
4
5
6
7
BaseService
public class BaseService<T> {
    @Autowired
    private BaseDAO<T> baseDAO;

    public void save() {
        baseDAO.save();
    }
}
2
3
4
5
6
7
8
BookService
@Service
public class BookService extends BaseService<Book> {
}
2
3
PhoneService
@Service
public class PhoneService extends BaseService<Phone> {
}
2
3
Test
//通过泛型依赖来配置 Bean
    @Test
    public void setProByDependencyInjection() {
        ApplicationContext ioc = new ClassPathXmlApplicationContext("beans07.xml");
        PhoneService phoneService = ioc.getBean("phoneService", PhoneService.class);
        phoneService.save(); //PhoneDAO save()
    }
2
3
4
5
6
7
解析:使用注解自动装配 BookDAO、PhoneDAO、BookService、PhoneService 后,因为 DAO 都带着泛型继承了 BaseDAO、Service 都带着泛型继承了 BaseService,而 BaseService 自动装配了 BaseDAO,通过泛型依赖注入,BookService 类中不用声明 BookDAO 属性就可以注入 BookDAO 属性,这里的步骤就是:BookService 继承了 BaseService 就带着泛型 Book 进入到 BaseService,因为 BaseService 装配了 BaseDAO 就带着泛型 Book 进入到 BaseDAO,看到 BaseDAO 下有个子类的泛型也是 Book 即 BookDAO 后就把 BookDAO 注入到 BookService 中了。
# 第 4 章 AOP 切面编程
# 4.1 动态代理
# 4.1.1 需求说明
(1)有 Vehicle(交通工具接口,有一个 run 方法),下面有两个实现类 Car 和 Ship
(2)当运行 Car 对象的 run 方法和 Ship 对象的 run 方法时,输出如下内容,注意观察前后有统一的输出
# 4.1.2 传统方式解决
public interface Vehicle {
    public void run();
}
2
3
public class Car implements Vehicle{
    @Override
    public void run() {
        System.out.println("交通工具开始运行了");
        System.out.println("小汽车在路上 running");
        System.out.println("交通工具停止运行了");
    }
}
2
3
4
5
6
7
8
public class Ship implements Vehicle{
    @Override
    public void run() {
        System.out.println("交通工具开始运行了");
        System.out.println("轮船在水上 running");
        System.out.println("交通工具停止运行了");
    }
}
2
3
4
5
6
7
8
public class TestVehicle {
    @Test
    public void run() {
        Vehicle car = new Car();
        car.run();
        Vehicle ship = new Ship();
        ship.run();
    }
}
2
3
4
5
6
7
8
9
# 4.1.3 动态代理方式解决
(1)动态代理解决思路,在调用方法时,使用反射机制,根据方法去决定调用哪个对象方法
Vehicle 接口
public interface Vehicle {
    public void run();
}
2
3
Car
public class Car implements Vehicle{
    @Override
    public void run() {
        System.out.println("小汽车在路上 running");
    }
}
2
3
4
5
6
Ship
public class Ship implements Vehicle{
    @Override
    public void run() {
        System.out.println("轮船在水上 running");
    }
}
2
3
4
5
6
VehicleProxyProvider
//该类可以返回一个代理对象
public class VehicleProxyProvider {
    //定义一个属性
    //target_vehicle 表示真正要执行的对象
    //该对象的类实现了 Vehicle 才可以调用
    private Vehicle target_vehicle;

    //构造器
    public VehicleProxyProvider(Vehicle target_vehicle) {
        this.target_vehicle = target_vehicle;
    }

    //编写一个方法,可以返回一个代理对象
    public Vehicle getProxy() {
        //得到类加载器
        ClassLoader classLoader = target_vehicle.getClass().getClassLoader();

        //得到要代理的对象/被执行的对象的接口信息
        Class<?>[] interfaces = target_vehicle.getClass().getInterfaces();

        //创建 InvocationHandler 对象
        /* InvocationHandler 的源代码
            public interface InvocationHandler {
                public Object invoke(Object proxy, Method method, Object[] args) throws Throwable;
            }
        */
        //因为 InvocationHandler 是接口不能被实例化,所以我们可以通过匿名对象的方式来创建该对象
        InvocationHandler invocationHandler = new InvocationHandler() {
            /**
             * invoke 方法会在执行 target_vehicle 的方法时被调用
             * proxy 表示代理对象
             * method 就是通过代理对象调用方法时的那个方法,比如当有 代理对象.run() 那么 method 就指的是 run 方法
             * args 表示调用 代理对象.run() 时传入的参数
             * return 返回的是 代理对象.run() 执行后的结果
             * */
            @Override
            public Object invoke(Object proxy, Method method, Object[] args) throws Throwable {
                System.out.println("交通工具开始运行了");
                //这里是反射,方法.对象
                Object result = method.invoke(target_vehicle, args);
                System.out.println("交通工具停止运行了");
                return result;
            }
        };

        /*
        * public static Object newProxyInstance(ClassLoader loader,
                                          Class<?>[] interfaces,
                                          InvocationHandler h) {}
        * (1) Proxy.newProxyInstance() 可以返回一个代理对象
        * (2) ClassLoader loader 是类的加载器
        * (3) Class<?>[] interfaces 就是将来要代理的对象的接口信息
        * (4) InvocationHandler h 是调用处理器/对象,有一个重要的方法是 invoke
        * */
        Vehicle proxy = (Vehicle) Proxy.newProxyInstance(classLoader, interfaces, invocationHandler);

        return proxy;
    }
}
2
3
4
5
6
7
8
9
10
11
12
13
14
15
16
17
18
19
20
21
22
23
24
25
26
27
28
29
30
31
32
33
34
35
36
37
38
39
40
41
42
43
44
45
46
47
48
49
50
51
52
53
54
55
56
57
58
59
TestVehicle
@Test
    public void proxyRun() {
        Vehicle vehicle = new Ship();
        //传入要代理的对象
        VehicleProxyProvider vehicleProxyProvider = new VehicleProxyProvider(vehicle);
        //获取代理对象,该对象可以代理执行方法
        //此时 proxy 编译类型是 Vehicle。运行类型是 代理类型,即 class com.sun.proxy.$Proxy9
        Vehicle proxy = vehicleProxyProvider.getProxy();
        //当执行 run 方法时,会执行到 代理对象的 invoke
        //如何体现动态 [1. 被代理的对象 2. 方法]
        proxy.run();
    }
2
3
4
5
6
7
8
9
10
11
12
交通工具开始运行了
轮船在水上 running
交通工具停止运行了
2
3
# 4.2 动态代理深入 - 横切关注点
# 4.2.1 需求说明
(1)有一个 SmartAnimal 接口,可以完成简单的加减法,要求在执行 getSum() 和 getSub() 时,输出执行前、执行过程、执行后的日志输出

# 4.2.2 使用传统方法完成
传统的解决思路,在各个方法的 [前、执行过程、后] 输出日志 OOP
//接口
public interface SmartAnimalable {
    //求和
    float getSum(float i, float j);
    //求查
    float getSub(float i, float j);
}
2
3
4
5
6
7
public class SmartDog implements SmartAnimalable{
    @Override
    public float getSum(float i, float j) {
        System.out.println("日志-方法名-getSum-参数 " + i + " " + j);
        float result = i + j;
        System.out.println("方法内部打印 result = " + result);
        System.out.println("日志-方法名-getSum-结果 result = " + result);
        return result;
    }

    @Override
    public float getSub(float i, float j) {
        System.out.println("日志-方法名-getSub-参数 " + i + " " + j);
        float result = i - j;
        System.out.println("方法内部打印 result = " + result);
        System.out.println("日志-方法名-getSub-结果 result = " + result);
        return result;
    }
}
2
3
4
5
6
7
8
9
10
11
12
13
14
15
16
17
18
19
public class AopTest {
    @Test
    public void smartDogTest() {
        SmartDog smartDog = new SmartDog();
        smartDog.getSum(10.78f, 89.7f);
        System.out.println("============");
        smartDog.getSub(10.78f, 89.7f);
    }
}
2
3
4
5
6
7
8
9
传统方法解决的优点:实现简单直接;缺点:日志代码维护不方便,代码复用性差
解决思路:
(1)使用动态代理来更好的处理日志记录问题
(2)其它比如封装函数,或者类的继承在这里都不是特别的合适
# 4.2.3 使用动态代理完成
要求考虑代理对象调用方法时可能出现的异常
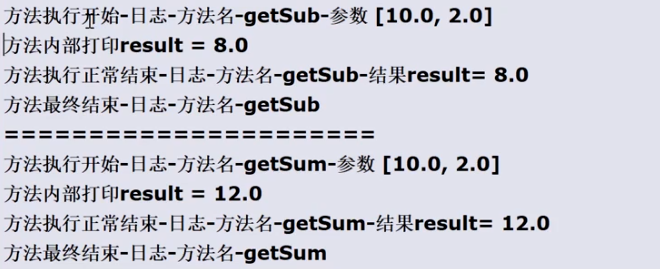
SmartAnimalable 接口
//接口
public interface SmartAnimalable {
    //求和
    float getSum(float i, float j);
    //求查
    float getSub(float i, float j);
}
2
3
4
5
6
7
SmartDog 类实现了 SmartAnimalable 接口
public class SmartDog implements SmartAnimalable{
    @Override
    public float getSum(float i, float j) {
        //System.out.println("日志-方法名-getSum-参数 " + i + " " + j);
        float result = i + j;
        System.out.println("方法内部打印 result = " + result);
        //System.out.println("日志-方法名-getSum-结果 result = " + result);
        return result;
    }

    @Override
    public float getSub(float i, float j) {
        //System.out.println("日志-方法名-getSub-参数 " + i + " " + j);
        float result = i - j;
        System.out.println("方法内部打印 result = " + result);
        //System.out.println("日志-方法名-getSub-结果 result = " + result);
        return result;
    }
}
2
3
4
5
6
7
8
9
10
11
12
13
14
15
16
17
18
19
MyProxyProvider 类,该类返回代理对象
//可以返回一个动态代理对象,可以执行 SmartDog 对象的方法
public class MyProxyProvider {
    //定义我们要执行的目标对象,该对象需要实现 SmartAnimalable 接口
    private SmartAnimalable target_obj;

    //构造器
    public MyProxyProvider(SmartAnimalable target_obj) {
        this.target_obj = target_obj;
    }

    //方法,可以返回代理对象,该代理对象可以执行目标对象
    public SmartAnimalable getProxy() {
        //1. 先得到类加载器/对象
        ClassLoader classLoader = target_obj.getClass().getClassLoader();

        //2. 得到要执行的目标对象的接口信息
        Class<?>[] interfaces = target_obj.getClass().getInterfaces();

        //3. 创建 InvocationHandler
        InvocationHandler invocationHandler = new InvocationHandler() {
            @Override
            public Object invoke(Object proxy, Method method, Object[] args) throws Throwable {
                Object result = null;
                try {
                    //下面这句代码也就是方法执行前的的代码就叫做横切关注点,也叫作前置通知
                    System.out.println("方法执行前-日志-方法名-" + method.getName() + "-参数 " + Arrays.asList(args));
                    //使用反射调用方法
                    //result 就是将来执行那个方法时的结果
                    result = method.invoke(target_obj, args);
                    //方法执行后的代码也叫作横切关注点,也叫作返回通知
                    System.out.println("方法执行正常结束-日志-方法名-"+ method.getName() +"-结果 result = " + result);

                } catch (Exception e) {
                    //如果在使用反射执行方法时出现异常,就会进入到 catch{}
                    e.printStackTrace();
                    //这里也是一个横切关注点,也叫作异常通知
                    System.out.println("方法执行异常-日志-方法名-"+ method.getName() +"-异常类型 = " + e.getClass().getName());
                } finally { //不管是否出现异常最终都会执行到 finally{}
                    //这里又是一个横切关注点,也叫作最终通知
                    System.out.println("方法最终结束-日志-方法名" + method.getName());
                }
                return result;
            }
        };

        //创建代理对象
        SmartAnimalable proxy = (SmartAnimalable) Proxy.newProxyInstance(classLoader, interfaces, invocationHandler);
        return proxy;
    }
}
2
3
4
5
6
7
8
9
10
11
12
13
14
15
16
17
18
19
20
21
22
23
24
25
26
27
28
29
30
31
32
33
34
35
36
37
38
39
40
41
42
43
44
45
46
47
48
49
50
AopTest 类,该类进行测试
@Test
    public void smartDogTestByProxy() {
        SmartAnimalable smartAnimalable = new SmartDog();
        MyProxyProvider myProxyProvider = new MyProxyProvider(smartAnimalable);
        //返回代理对象
        SmartAnimalable proxy = myProxyProvider.getProxy();

        proxy.getSum(10, 2);
        System.out.println("=============");
        proxy.getSub(10, 2);
    }
2
3
4
5
6
7
8
9
10
11
方法执行前-日志-方法名-getSum-参数 [10.0, 2.0]
方法内部打印 result = 12.0
方法执行正常结束-日志-方法名-getSum-结果 result = 12.0
方法最终结束-日志-方法名getSum
=============
方法执行前-日志-方法名-getSub-参数 [10.0, 2.0]
方法内部打印 result = 8.0
方法执行正常结束-日志-方法名-getSub-结果 result = 8.0
方法最终结束-日志-方法名getSub
2
3
4
5
6
7
8
9
# 4.3 问题再次出现
# 4.3.1 提出问题
(1)在 MyProxyProvider 类中,我们的输出语句功能比较弱,而且还是硬编码,在实际开发中,我们希望是以一个方法的形式嵌入到反射执行的方法前,该怎么办?,意思就是把那些输出语句可以封装到方法中,然后通过方法调用
# 4.3.2 用土方法解决
(1)需求分析:使用土方法解决前面的问题,后面再使用 Spring 的 AOP 组件完成,先过苦日子,再过甜日子
MyProxyProvider 类
//可以返回一个动态代理对象,可以执行 SmartDog 对象的方法
public class MyProxyProvider {
    //定义我们要执行的目标对象,该对象需要实现 SmartAnimalable 接口
    private SmartAnimalable target_obj;

    //构造器
    public MyProxyProvider(SmartAnimalable target_obj) {
        this.target_obj = target_obj;
    }

    //自己定义的方法,在反射执行方法(目标方法)执行前执行
    public void before(Object proxy, Method method, Object[] args) {
        //下面这句代码也就是方法执行前的的代码就叫做横切关注点,也叫作前置通知
        System.out.println("before-方法执行前-日志-方法名-" + method.getName() + "-参数 " + Arrays.asList(args));
    }

    //自己定义的方法,在反射执行方法(目标方法)执行后执行
    public void after(Method method, Object result) {
        //方法执行后的代码也叫作横切关注点,也叫作返回通知
        System.out.println("after-方法执行正常结束-日志-方法名-"+ method.getName() +"-结果 result = " + result);
    }

    //方法,可以返回代理对象,该代理对象可以执行目标对象
    public SmartAnimalable getProxy() {
        //1. 先得到类加载器/对象
        ClassLoader classLoader = target_obj.getClass().getClassLoader();

        //2. 得到要执行的目标对象的接口信息
        Class<?>[] interfaces = target_obj.getClass().getInterfaces();

        //3. 创建 InvocationHandler
        InvocationHandler invocationHandler = new InvocationHandler() {
            @Override
            public Object invoke(Object proxy, Method method, Object[] args) throws Throwable {
                Object result = null;
                try {
                    before(proxy, method, args);

                    //使用反射调用方法
                    //result 就是将来执行那个方法时的结果
                    result = method.invoke(target_obj, args);

                    after(method, result);

                } catch (Exception e) {
                    //如果在使用反射执行方法时出现异常,就会进入到 catch{}
                    e.printStackTrace();
                    //这里也是一个横切关注点,也叫作异常通知
                    System.out.println("方法执行异常-日志-方法名-"+ method.getName() +"-异常类型 = " + e.getClass().getName());
                } finally { //不管是否出现异常最终都会执行到 finally{}
                    //这里又是一个横切关注点,也叫作最终通知
                    System.out.println("方法最终结束-日志-方法名" + method.getName());
                }
                return result;
            }
        };

        //创建代理对象
        SmartAnimalable proxy = (SmartAnimalable) Proxy.newProxyInstance(classLoader, interfaces, invocationHandler);
        return proxy;
    }
}
2
3
4
5
6
7
8
9
10
11
12
13
14
15
16
17
18
19
20
21
22
23
24
25
26
27
28
29
30
31
32
33
34
35
36
37
38
39
40
41
42
43
44
45
46
47
48
49
50
51
52
53
54
55
56
57
58
59
60
61
62
问题分析:耦合度高
# 4.3.3 对土方法解耦 - 开发简易的 AOP 类
HspAOP 类
//我们自己编写的一个极简的 AOP 类
public class HspAOP {
    //自己定义的方法,在反射执行方法(目标方法)执行前执行
    public static void before(Object proxy, Method method, Object[] args) {
        //下面这句代码也就是方法执行前的的代码就叫做横切关注点,也叫作前置通知
        System.out.println("HspAOP-方法执行前-日志-方法名-" + method.getName() + "-参数 " + Arrays.asList(args));
    }

    //自己定义的方法,在反射执行方法(目标方法)执行后执行
    public static void after(Method method, Object result) {
        //方法执行后的代码也叫作横切关注点,也叫作返回通知
        System.out.println("HspAOP-方法执行正常结束-日志-方法名-"+ method.getName() +"-结果 result = " + result);
    }
}
2
3
4
5
6
7
8
9
10
11
12
13
14
MyProxyProvider 类
//可以返回一个动态代理对象,可以执行 SmartDog 对象的方法
public class MyProxyProvider {
    //定义我们要执行的目标对象,该对象需要实现 SmartAnimalable 接口
    private SmartAnimalable target_obj;

    //构造器
    public MyProxyProvider(SmartAnimalable target_obj) {
        this.target_obj = target_obj;
    }

    /*//自己定义的方法,在反射执行方法(目标方法)执行前执行
    public void before(Object proxy, Method method, Object[] args) {
        //下面这句代码也就是方法执行前的的代码就叫做横切关注点,也叫作前置通知
        System.out.println("before-方法执行前-日志-方法名-" + method.getName() + "-参数 " + Arrays.asList(args));
    }*/

    /*//自己定义的方法,在反射执行方法(目标方法)执行后执行
    public void after(Method method, Object result) {
        //方法执行后的代码也叫作横切关注点,也叫作返回通知
        System.out.println("after-方法执行正常结束-日志-方法名-"+ method.getName() +"-结果 result = " + result);
    }*/

    //方法,可以返回代理对象,该代理对象可以执行目标对象
    public SmartAnimalable getProxy() {
        //1. 先得到类加载器/对象
        ClassLoader classLoader = target_obj.getClass().getClassLoader();

        //2. 得到要执行的目标对象的接口信息
        Class<?>[] interfaces = target_obj.getClass().getInterfaces();

        //3. 创建 InvocationHandler
        InvocationHandler invocationHandler = new InvocationHandler() {
            @Override
            public Object invoke(Object proxy, Method method, Object[] args) throws Throwable {
                Object result = null;
                try {
                    //before(proxy, method, args);
                    HspAOP.before(proxy, method, args);

                    //使用反射调用方法
                    //result 就是将来执行那个方法时的结果
                    result = method.invoke(target_obj, args);

                    //after(method, result);
                    HspAOP.after(method, result);

                } catch (Exception e) {
                    //如果在使用反射执行方法时出现异常,就会进入到 catch{}
                    e.printStackTrace();
                    //这里也是一个横切关注点,也叫作异常通知
                    System.out.println("方法执行异常-日志-方法名-"+ method.getName() +"-异常类型 = " + e.getClass().getName());
                } finally { //不管是否出现异常最终都会执行到 finally{}
                    //这里又是一个横切关注点,也叫作最终通知
                    System.out.println("方法最终结束-日志-方法名" + method.getName());
                }
                return result;
            }
        };

        //创建代理对象
        SmartAnimalable proxy = (SmartAnimalable) Proxy.newProxyInstance(classLoader, interfaces, invocationHandler);
        return proxy;
    }
}
2
3
4
5
6
7
8
9
10
11
12
13
14
15
16
17
18
19
20
21
22
23
24
25
26
27
28
29
30
31
32
33
34
35
36
37
38
39
40
41
42
43
44
45
46
47
48
49
50
51
52
53
54
55
56
57
58
59
60
61
62
63
64
# 4.3.4 再次分析 - 提出 Spring AOP
(1)土方法不够灵活
(2)土方法复用性差
(3)土方法还是一种硬编码(因为没有注解和反射支撑)
(4)Spring AOP 闪亮登场,底层是 ASPECTJ
# 4.4 AOP 的基本介绍
# 4.4.1 什么是 AOP
AOP 的全称是 Aspect Oriented Programming,即面向切面的编程
面向对象编程
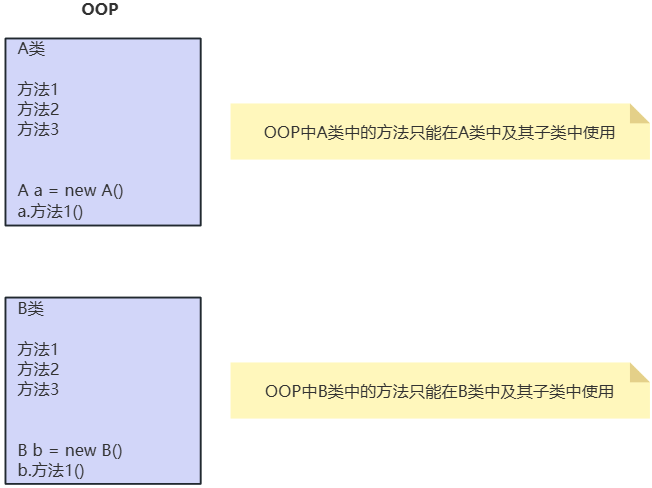
面向切面编程
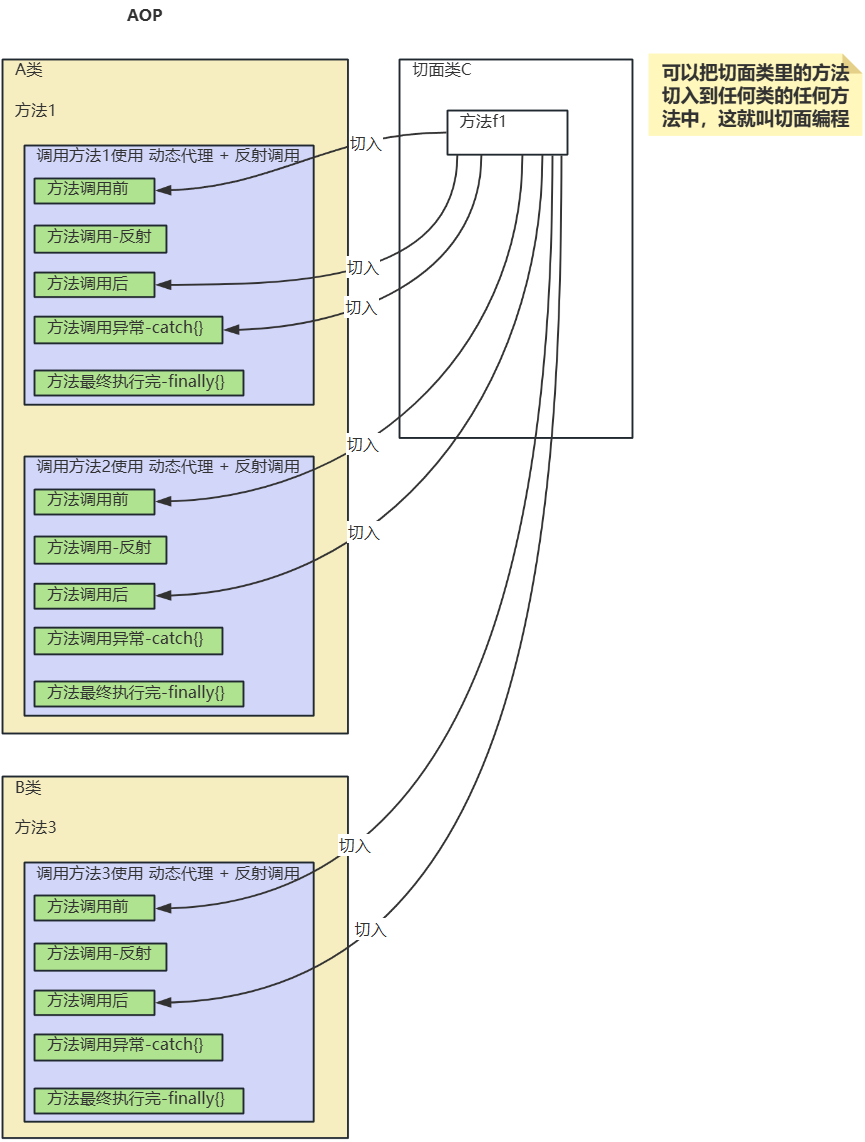
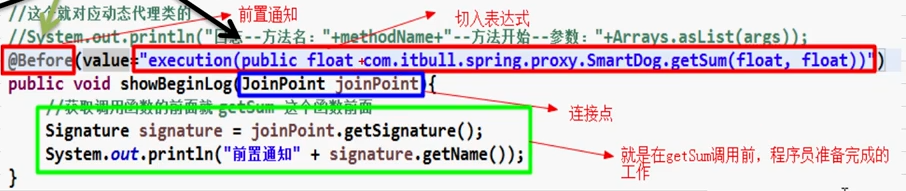
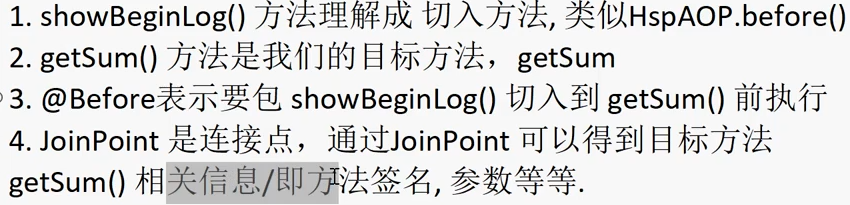
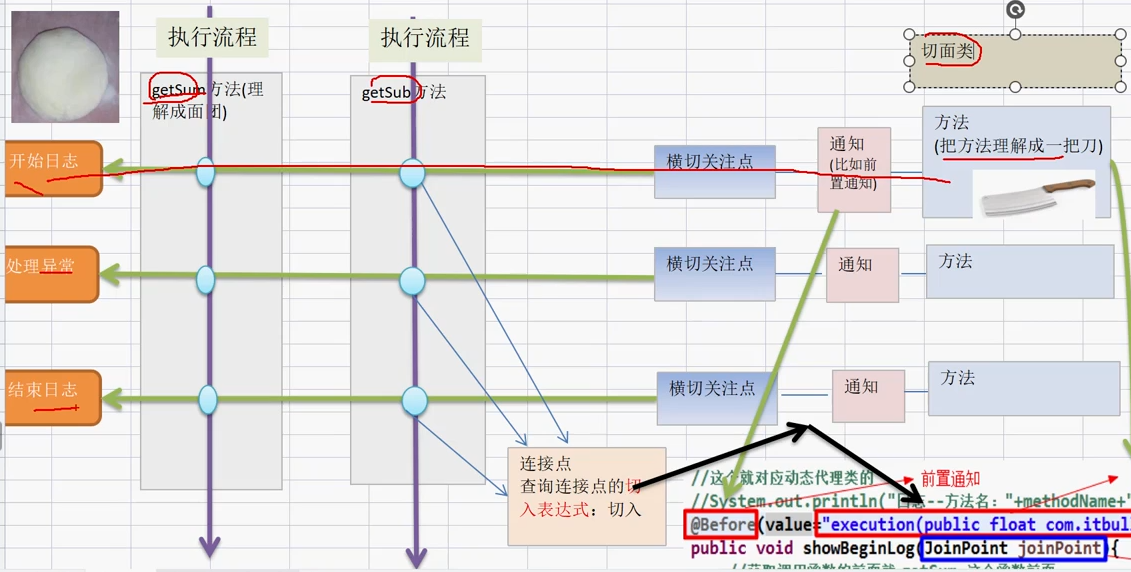

# 4.5 AOP 编程快速入门
# 4.5.1 基本说明
(1)需要引入核心的 aspect 包
(2)在切面类中声明通知方法:
1)前置通知:@Before
2)返回通知:@AfterReturning
3)异常通知:@AfterThrowing
4)后置通知:@After
5)环绕通知:@Around
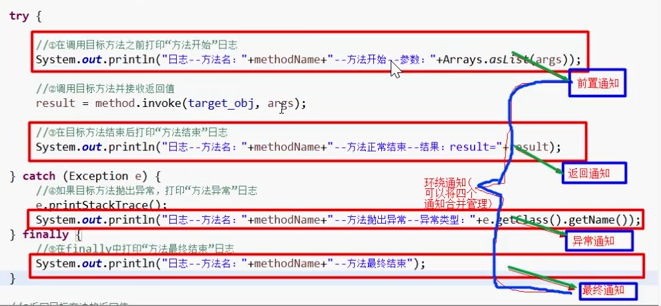
# 4.5.2 快速入门实例
(1)需求说明:使用 AOP 编程的方式,来实现手写的动态代理案例效果,就以上一个案例为例来讲解
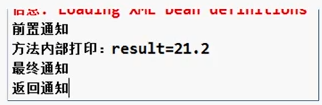
(2)导入 AOP 编程需要的包
(3)代码实现
SmartAnimalable 接口
//接口
public interface SmartAnimalable {
    //求和
    float getSum(float i, float j);
    //求查
    float getSub(float i, float j);
}
2
3
4
5
6
7
SmartDog实现类
@Component //使用 @Component 当 Spring 容器启动时,将 SmartDog 注入到容器
public class SmartDog implements SmartAnimalable{
    @Override
    public float getSum(float i, float j) {
        float result = i + j;
        System.out.println("方法内部打印 result = " + result);
        return result;
    }

    @Override
    public float getSub(float i, float j) {
        float result = i - j;
        System.out.println("方法内部打印 result = " + result);
        return result;
    }
}
2
3
4
5
6
7
8
9
10
11
12
13
14
15
16
SmartAnimalAspect 切面类
@Aspect //表示是一个切面类 [底层有切面编程的支撑(动态代理+反射+动态绑定)]
@Component //会注入 SmartAnimalAspect 到容器
public class SmartAnimalAspect {
    //自己定义的方法,在反射执行方法(目标方法)执行前执行
    /**
     * (1) @Before 表示前置通知,即在我们的目标对象执行方法前执行
     * (2) value = "execution(public float com.hspedu.spring.aop.aspectj.SmartDog.getSum(float, float))" 表示要把前置通知放在 value = 的这个方法之前,即指定切入到哪个类的哪个方法,形式是:访问修饰符 返回类型 全类名.方法名(形参列表)
     * (3) f1 方法可以理解成就是一个切入方法,这个方法名是可以程序员指定的
     * (4) JoinPoint joinPoint 在底层执行时,由 AspectJ 切面框架,会给该切入方法传入 joinPoint 对象,joinPoint 对象里有 Object proxy, Method method, Object[] args 这些信息
     * */
    @Before(value = "execution(public float com.hspedu.spring.aop.aspectj.SmartDog.getSum(float, float))")
    public void f1(JoinPoint joinPoint) {
        Signature signature = joinPoint.getSignature();
        //下面这句代码也就是方法执行前的的代码就叫做横切关注点,也叫作前置通知
        System.out.println("切面类 f1() -方法执行前-日志-方法名-" + signature.getName() + "-参数 " + Arrays.asList(joinPoint.getArgs()));
    }

    //自己定义的方法,在反射执行方法(目标方法)执行后执行
    @AfterReturning(value = "execution(public float com.hspedu.spring.aop.aspectj.SmartDog.getSum(float, float))")
    public void f2(JoinPoint joinPoint) {
        //方法执行后的代码也叫作横切关注点,也叫作返回通知
        Signature signature = joinPoint.getSignature();
        System.out.println("切面类 f2() -方法执行正常结束后-日志-方法名-" + signature.getName() + "-结果 ");
    }

    //异常通知
    @AfterThrowing(value = "execution(public float com.hspedu.spring.aop.aspectj.SmartDog.getSum(float, float))")
    public void f3(JoinPoint joinPoint) {
        //方法执行后的代码也叫作横切关注点,也叫作返回通知
        Signature signature = joinPoint.getSignature();
        System.out.println("切面类 f3() -方法执行异常后-日志-方法名-" + signature.getName());
    }

    //最终通知:即把 f4 方法切入到目标方法执行后(不管是否发生异常,都要执行)
    @After(value = "execution(public float com.hspedu.spring.aop.aspectj.SmartDog.getSum(float, float))")
    public void f4(JoinPoint joinPoint) {
        //方法执行后的代码也叫作横切关注点,也叫作返回通知
        Signature signature = joinPoint.getSignature();
        System.out.println("切面类 f4() -方法最终执行完毕-日志-方法名-" + signature.getName());
    }
}
2
3
4
5
6
7
8
9
10
11
12
13
14
15
16
17
18
19
20
21
22
23
24
25
26
27
28
29
30
31
32
33
34
35
36
37
38
39
40
41
配置文件
<context:component-scan base-package="com.hspedu.spring.aop.aspectj"/>
    <!--开启基于注解的 AOP 功能-->
    <aop:aspectj-autoproxy/>
2
3
测试类
public class AopAspectjTest {
    @Test
    public void smartDogTestByProxy() {
        //得到 Spring 容器
        ApplicationContext ioc = new ClassPathXmlApplicationContext("beans08.xml");
        //这里我们需要通过接口类型来获取到注入的 SmartDog 对象 - 就是代理对象
        SmartAnimalable smartAnimalable = ioc.getBean(SmartAnimalable.class);
        smartAnimalable.getSum(10, 2);
        System.out.println("smartAnimalable 的运行类型 = " + smartAnimalable.getClass()); //smartAnimalable 的运行类型 = class com.sun.proxy.$Proxy13
    }
}
2
3
4
5
6
7
8
9
10
11
切面类 f1() -方法执行前-日志-方法名-getSum-参数 [10.0, 2.0]
方法内部打印 result = 12.0
切面类 f2() -方法执行正常结束后-日志-方法名-getSum-返回的结果是 = 12.0
切面类 f4() -方法最终执行完毕-日志-方法名-getSum
smartAnimalable 的运行类型 = class com.sun.proxy.$Proxy19
2
3
4
5
# 4.5.3 细节说明
(1)关于切面类方法命名规范:showBeginLog(),showSuccessEndLog(),showExceptionLog(),showFinallyEndLog()
(2)切入表达式的更多配置,比如使用模糊配置
@Before(value="execution(* com.hspedu.aop.proxy.SmartDog.*(..))")
(3)表示所有访问权限,所有包下的所有类的所有方法,都会被执行该前置通知方法
@Before(value="execution(* *.*(..))")
(4)当 Spring 容器开启了基于注解的 AOP 的功能 <aop:aspectj-autoproxy/> ,我们获取注入的对象,需要以接口的类型来获取,因为注入的对象.getClass() 已经是代理类型了
(5)当 Spring 容器开启了基于注解的 AOP 的功能 <aop:aspectj-autoproxy/> ,我们获取注入的对象,也可以通过 id 来获取,但是也要转成接口类型
# 4.5.4 课后作业
(1)有接口 UsbInterface 里有方法 work
(2)实现子类 Phone 和 Camera,实现 UsbInterface
(3)在 SmartAnimalAspect 切面类中写一个方法(可输出日志信息)等作为前置通知,在 Phone 和 Camera 对象执行 work 方法前调用
(4)其它返回通知,异常通知,后置通知也可以加入
接口
public interface UsbInterface {
    public void work();
}
2
3
实现类
@Component //把 Phone 对象当做一个组件注入到容器中
public class Phone implements UsbInterface{
    @Override
    public void work() {
        System.out.println("手机开始工作了...");
    }
}
2
3
4
5
6
7
@Component //将 Camera 注入到 Spring 容器中
public class Camera implements UsbInterface{
    @Override
    public void work() {
        System.out.println("相机开始工作了...");
    }
}
2
3
4
5
6
7
切面类
@Before(value = "execution(public void com.hspedu.spring.aop.aspectj.Phone.work()) || execution(public void com.hspedu.spring.aop.aspectj.Camera.work())")
    public void hi(JoinPoint joinPoint) {
        Signature signature = joinPoint.getSignature();
        System.out.println("切面类的 hi() - 执行的目标方法- " +signature.getName());
    }
2
3
4
5
测试类
@Test
    public void smartDogTestByProxy2() {
        //得到 Spring 容器
        ApplicationContext ioc = new ClassPathXmlApplicationContext("beans08.xml");
        //这里我们需要通过 id 来获取到注入的 Phone 对象,但是要转成接口类型
        UsbInterface phone = (UsbInterface) ioc.getBean("phone");
        UsbInterface camera = (UsbInterface) ioc.getBean("camera");

        phone.work();

        System.out.println("========");

        camera.work();
    }
2
3
4
5
6
7
8
9
10
11
12
13
14
# 4.6 AOP 切入表达式
# 4.6.1 具体使用
(1)作用:通过表达式的方式定位一个或多个具体的连接点
(2)语法细节:
1)切入点表达式的语法格式:execution([权限修饰符] [返回值类型] [简单类名/全类名] [方法名]([参数列表]))
2)举例说明:
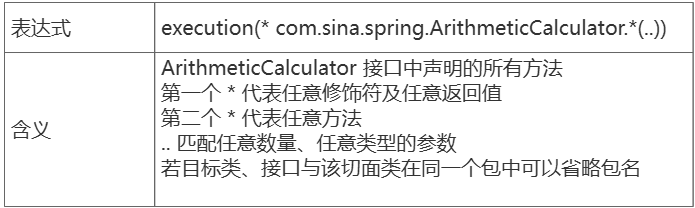
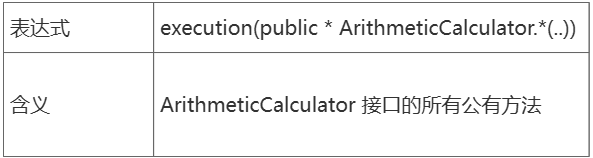
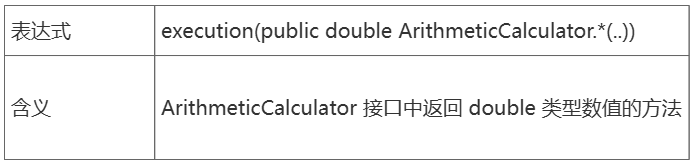
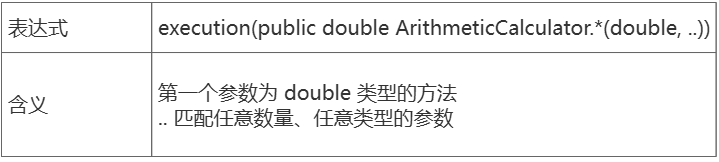

3)在 AspectJ 中,切入点表达式可以通过 &&、||、! 等操作符结合起来

# 4.6.2 注意事项和细节
(1)切入表达式可以指向类的方法,这时切入表达式会对该类/对象生效
(2)切入表达式可以指向接口的方法,这时切入表达式会对实现了接口的类/对象生效
(3)切入表达式可以对没有实现接口的类进行切入
Car 类
@Component //把 Car 作为一个组件,注入到 Spring 容器中
public class Car {
    public void run() {
        System.out.println("小汽车在 running");
    }
}
2
3
4
5
6
切面类
//给 Car 配置一个前置通知
    @Before(value = "execution(public void com.hspedu.spring.aop.aspectj.Car.run())")
    public void ok1(JoinPoint joinPoint) {
        Signature signature = joinPoint.getSignature();
        System.out.println("切面类的 ok1() - 执行的目标方法- " +signature.getName());
    }
2
3
4
5
6
测试类
@Test
    public void test3() {
        //得到 Spring 容器
        ApplicationContext ioc = new ClassPathXmlApplicationContext("beans08.xml");
        Car car = ioc.getBean(Car.class);
        car.run();
    }
2
3
4
5
6
7
切面类的 ok1() - 执行的目标方法- run
小汽车在 running
2
# 4.6.3 动态代理中 JDK 的 Proxy 的代理和 Spring 的 CGlib 的代理的特点和区别
(1)JDK 的 Proxy 动态代理是面向接口的动态代理
特点:
1)一定要有接口和实现类的存在,代理对象增强的是实现类在实现接口时重写的方法
2)生成的代理对象只能转换成接口的不能转换成被代理类
3)代理对象只能增强接口中定义的方法,实现类中的其它的和接口无关的方法是无法增强的
4)代理对象只能读取到实现类实现接口中的方法上的注解,不能读取到实现类中特有方法上的注解
(2)Spring 的 CGlib 动态代理是面向父类的动态代理
特点:
1)面向父类的和接口没有直接关系
2)不仅可以增强接口中定义的方法还可以增强其它方法
3)可以读取父类中方法上的所有注解
(3)两个动态代理的区别
1)JDK 动态代理是面向接口的,只能增强实现类中接口中存在的方法;CGlib 是面向父类的,可以增强父类的所有方法
2)JDK 得到的对象是代理对象实例,而 CGlib 得到的对象是被代理对象的子类
# 4.7 JoinPoint
# 4.7.1 应用实例
通过 JoinPoint 可以获取到调用方法的签名
应用实例需求:在调用前置通知获取到调用方法的签名和其它相关信息
代码实现:前面已经写过了
其它常用方法:
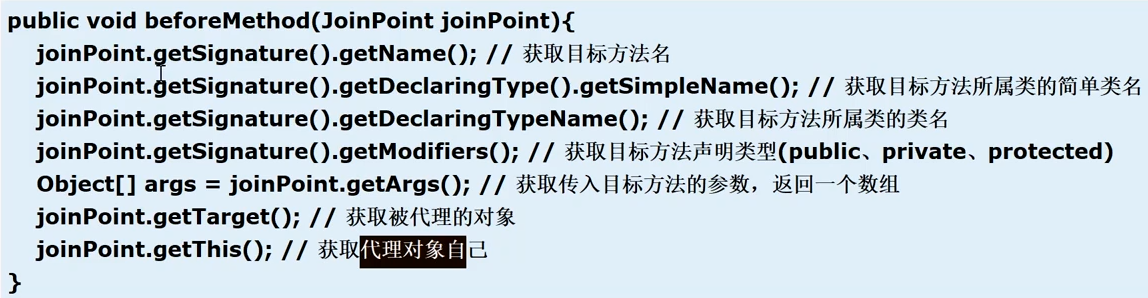
# 4.8 返回通知获取结果
/**
     * (1) 如果我们希望把目标方法执行的结果返回给切入方法,可以在 @AfterReturning 里增加属性,比如 returning = "res",同时在切入方法中增加形参 Object res
     * (2) 注意 returning = "res" 和 Object res 的 res 要一致
     * */
    @AfterReturning(value = "execution(public float com.hspedu.spring.aop.aspectj.SmartDog.getSum(float, float))", returning = "res")
    public void f2(JoinPoint joinPoint, Object res) {
        //方法执行后的代码也叫作横切关注点,也叫作返回通知
        Signature signature = joinPoint.getSignature();
        System.out.println("切面类 f2() -方法执行正常结束后-日志-方法名-" + signature.getName() + "-返回的结果是 = " + res);
    }
2
3
4
5
6
7
8
9
10
# 4.9 异常通知中获取异常
//异常通知
    @AfterThrowing(value = "execution(public float com.hspedu.spring.aop.aspectj.SmartDog.getSum(float, float))", throwing = "throwable")
    public void f3(JoinPoint joinPoint, Throwable throwable) {
        //方法执行后的代码也叫作横切关注点,也叫作返回通知
        Signature signature = joinPoint.getSignature();
        System.out.println("切面类 f3() -方法执行异常后-日志-方法名-" + signature.getName() + " 异常信息 = " + throwable);
    }
2
3
4
5
6
7
# 4.10 环绕通知(了解)
# 4.11 切入点表达式重用
为了统一管理切入点表达式,可以使用切入点表达式重用技术
@Aspect //表示是一个切面类 [底层有切面编程的支撑(动态代理+反射+动态绑定)]
@Component //会注入 SmartAnimalAspect 到容器
public class SmartAnimalAspect {

    //定义一个切入点,在后面使用时可以直接引用,提高了复用性
    @Pointcut(value = "execution(public float com.hspedu.spring.aop.aspectj.SmartDog.getSum(float, float))")
    public void myPointCut() {

    }

    //自己定义的方法,在反射执行方法(目标方法)执行前执行
    //@Before(value = "execution(public float com.hspedu.spring.aop.aspectj.SmartDog.getSum(float, float))")
    //这里我们使用定义好的切入点
    @Before(value = "myPointCut()")
    public void f1(JoinPoint joinPoint) {
        Signature signature = joinPoint.getSignature();
        //下面这句代码也就是方法执行前的的代码就叫做横切关注点,也叫作前置通知
        System.out.println("切面类 f1() -方法执行前-日志-方法名-" + signature.getName() + "-参数 " + Arrays.asList(joinPoint.getArgs()));
    }

    //自己定义的方法,在反射执行方法(目标方法)执行后执行
    //@AfterReturning(value = "execution(public float com.hspedu.spring.aop.aspectj.SmartDog.getSum(float, float))", returning = "res")
    //使用切入点
    @AfterReturning(value = "myPointCut()", returning = "res")
    public void f2(JoinPoint joinPoint, Object res) {
        //方法执行后的代码也叫作横切关注点,也叫作返回通知
        Signature signature = joinPoint.getSignature();
        System.out.println("切面类 f2() -方法执行正常结束后-日志-方法名-" + signature.getName() + "-返回的结果是 = " + res);
    }
}
2
3
4
5
6
7
8
9
10
11
12
13
14
15
16
17
18
19
20
21
22
23
24
25
26
27
28
29
30
# 4.12 切面优先级问题
# 4.12.1 基本概念
如果一个方法有多个切面类在同一个切入点切入,那么执行的优先级如何控制?
基本语法:@order(value=n) 来控制 n 值,n 值越小优先级越高
# 4.12.2 注意事项和细节说明
(1)不能理解成:优先级高的每个消息通知都先执行,这个和方法调用机制和 Filter 过滤器链式调用类似
(2)流程图
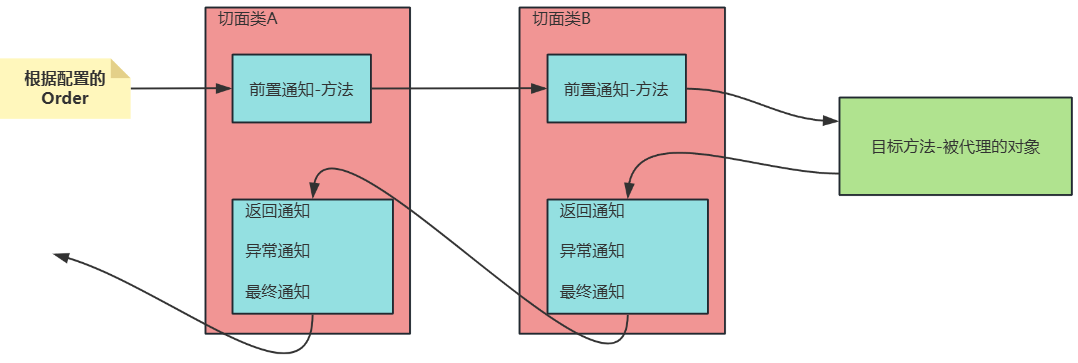
# 4.13 基于 XML 配置 AOP
(1)前面我们是通过注解来配置 AOP 的,在 Spring 中,我们也可以通过 XML 的方式来配置 AOP
(2)代码实现
SmartAnimalable 接口
//接口
public interface SmartAnimalable {
    //求和
    float getSum(float i, float j);
    //求查
    float getSub(float i, float j);
}
2
3
4
5
6
7
SmartDog 实现类
public class SmartDog implements SmartAnimalable {
    @Override
    public float getSum(float i, float j) {
        float result = i + j;
        System.out.println("方法内部打印 result = " + result);
        return result;
    }

    @Override
    public float getSub(float i, float j) {
        float result = i - j;
        System.out.println("方法内部打印 result = " + result);
        return result;
    }
}
2
3
4
5
6
7
8
9
10
11
12
13
14
15
SmartAnimalAspect 切面类
public class SmartAnimalAspect {
    public void f1(JoinPoint joinPoint) {
        Signature signature = joinPoint.getSignature();
        //下面这句代码也就是方法执行前的的代码就叫做横切关注点,也叫作前置通知
        System.out.println("切面类 f1() -方法执行前-日志-方法名-" + signature.getName() + "-参数 " + Arrays.asList(joinPoint.getArgs()));
    }

    public void f2(JoinPoint joinPoint, Object res) {
        //方法执行后的代码也叫作横切关注点,也叫作返回通知
        Signature signature = joinPoint.getSignature();
        System.out.println("切面类 f2() -方法执行正常结束后-日志-方法名-" + signature.getName() + "-返回的结果是 = " + res);
    }

    public void f3(JoinPoint joinPoint, Throwable throwable) {
        //方法执行后的代码也叫作横切关注点,也叫作返回通知
        Signature signature = joinPoint.getSignature();
        System.out.println("切面类 f3() -方法执行异常后-日志-方法名-" + signature.getName() + " 异常信息 = " + throwable);
    }

    public void f4(JoinPoint joinPoint) {
        //方法执行后的代码也叫作横切关注点,也叫作返回通知
        Signature signature = joinPoint.getSignature();
        System.out.println("切面类 f4() -方法最终执行完毕-日志-方法名-" + signature.getName());
    }
}
2
3
4
5
6
7
8
9
10
11
12
13
14
15
16
17
18
19
20
21
22
23
24
25
xml 配置文件
<?xml version="1.0" encoding="UTF-8"?>
<beans xmlns="http://www.springframework.org/schema/beans"
       xmlns:xsi="http://www.w3.org/2001/XMLSchema-instance" xmlns:aop="http://www.springframework.org/schema/aop"
       xsi:schemaLocation="http://www.springframework.org/schema/beans http://www.springframework.org/schema/beans/spring-beans.xsd http://www.springframework.org/schema/aop https://www.springframework.org/schema/aop/spring-aop.xsd">

    <!--使用 XML 配置,完成 AOP 编程-->
    <!--注入一个切面类对象-->
    <bean class="com.hspedu.spring.aop.xml.SmartAnimalAspect" id="smartAnimalAspect"/>
    <!--注入一个 SmartDog 对象-->
    <bean class="com.hspedu.spring.aop.xml.SmartDog" id="smartDog"/>

    <!--配置切面类-->
    <aop:config>
        <!--配置切入点-->
        <aop:pointcut id="myPointCut" expression="execution(public float com.hspedu.spring.aop.xml.SmartDog.getSum(float, float))"/>
        <!--配置切面的前置、返回、异常、最终通知-->
        <aop:aspect ref="smartAnimalAspect" order="10">
            <!--配置前置通知-->
            <!--解读:意思就是把 smartAnimalAspect 类中的 f1 方法,作为前置通知切入到 myPointCut 的这个点的位置,这个点的位置就是上面配置的位置-->
            <aop:before method="f1" pointcut-ref="myPointCut"/>
            <!--返回通知-->
            <!--解读:f2 方法切入到 myPointCut 这个点的位置,myPointCut 这个点的位置的方法执行完毕后将结果返回给 res,res 又作为 f2 的形参,从而 f2 可以取得结果-->
            <aop:after-returning method="f2" pointcut-ref="myPointCut" returning="res"/>
            <!--异常通知-->
            <aop:after-throwing method="f3" pointcut-ref="myPointCut" throwing="throwable"/>
            <!--最终通知-->
            <aop:after method="f4" pointcut-ref="myPointCut"/>
        </aop:aspect>
    </aop:config>
</beans>
2
3
4
5
6
7
8
9
10
11
12
13
14
15
16
17
18
19
20
21
22
23
24
25
26
27
28
29
30
AopAspectjXMLTest 测试类
public class AopAspectjXMLTest {
    @Test
    public void testAspectByXML() {
        ApplicationContext ioc = new ClassPathXmlApplicationContext("beans09.xml");
        SmartAnimalable smartAnimalable = ioc.getBean(SmartAnimalable.class);
        smartAnimalable.getSum(10, 2);
    }
}
2
3
4
5
6
7
8
# 4.14 课后作业
# 4.14.1 作业布置
(1)编写一个 Cal 接口
有方法 cal1(int n) 计算 1+2+..+n
有方法 cal2(int n) 计算 1*2*..*n
(2)编写类 MyCal 实现接口 Cal
(3)分别使用注解方式、XML 配置方式完成 AOP 编程
1)在执行 cal1 前打印开始执行的时间,在执行完后打印时间
2)在执行 cal2 前打印开始执行的时间,在执行完后打印时间
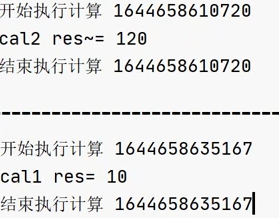
# 第 6 章 JDBCTemplate
# 6.1 实际需求
如果程序员使用 Spring 框架来做项目,Spring 框架如何处理对数据库的操作呢?
(1)使用前面做项目开发的 JDBCUtils 类
(2)使用 Spring 提供的一个操作数据库的功能强大的类 JDBCTemplate,我们可以通过 ioc 容器来配置一个 JDBCTemplate 对象,使用它来完成对数据库表的各种操作
# 6.2 JDBCTemplate 基本介绍
(1)通过 Spring 可以配置数据源,从而完成对数据表的操作
(2)JDBCTemplate 是 Spring 提供的访问数据库的技术,可以将 JDBC 的常用操作封装为模板方法
# 6.3 JDBCTemplate 使用实例
# 6.3.1 需求说明
使用 Spring 的方式来完成 JDBCTemplate 的配置和使用
# 6.3.2 JDBCTemplate 的使用
(1)引入使用 JDBCTemplate 需要的 jar 包
(2)创建数据库 Spring 和表 monster
-- 创建数据库
create database spring;
use spring;

-- 创建表 monster
create table monster (
    id int primary key ,
    name varchar(64) not null default '',
    skill varchar(64) not null default ''
);

insert into monster values (100, '青牛怪', '吐火');
insert into monster values (200, '黄袍怪', '吐烟');
insert into monster values (300, '蜘蛛怪', '吐丝');
2
3
4
5
6
7
8
9
10
11
12
13
14
(3)创建配置文件 src/jdbc.properties
jdbc.user=root
jdbc.pwd=123456
jdbc.driver=com.mysql.jdbc.Driver
jdbc.url=jdbc:mysql://localhost:3306/spring
2
3
4
(4)创建配置文件 src/JdbcTemplate_ioc.xml
<?xml version="1.0" encoding="UTF-8"?>
<beans xmlns="http://www.springframework.org/schema/beans"
       xmlns:xsi="http://www.w3.org/2001/XMLSchema-instance"
       xmlns:context="http://www.springframework.org/schema/context"
       xsi:schemaLocation="http://www.springframework.org/schema/beans http://www.springframework.org/schema/beans/spring-beans.xsd http://www.springframework.org/schema/context https://www.springframework.org/schema/context/spring-context.xsd">

    <!--引入外部的 jdbc.properties 文件-->
    <context:property-placeholder location="classpath:jdbc.properties"/>
    <!--配置数据源对象-DataSource-->
    <bean class="com.mchange.v2.c3p0.ComboPooledDataSource" id="dataSource">
        <!--给数据源对象配置属性值-->
        <property name="user" value="${jdbc.user}"/>
        <property name="password" value="${jdbc.pwd}"/>
        <property name="driverClass" value="${jdbc.driver}"/>
        <property name="jdbcUrl" value="${jdbc.url}"/>
    </bean>
</beans>
2
3
4
5
6
7
8
9
10
11
12
13
14
15
16
17
(5)测试
public class JdbcTemplateTest {
    @Test
    public void testDatasourceByJdbcTemplate() throws SQLException {
        //获取到容器
        ApplicationContext ioc = new ClassPathXmlApplicationContext("JdbcTemplate_ioc.xml");
        DataSource dataSource = ioc.getBean(DataSource.class);
        Connection connection = dataSource.getConnection();
        System.out.println("获取到 connection = " + connection);
        connection.close();
        System.out.println("ok");
    }
}
2
3
4
5
6
7
8
9
10
11
12
(6)配置 JdbcTemplate_ioc.xml,将数据源分配给 JdbcTemplate bean
<?xml version="1.0" encoding="UTF-8"?>
<beans xmlns="http://www.springframework.org/schema/beans"
       xmlns:xsi="http://www.w3.org/2001/XMLSchema-instance"
       xmlns:context="http://www.springframework.org/schema/context"
       xsi:schemaLocation="http://www.springframework.org/schema/beans http://www.springframework.org/schema/beans/spring-beans.xsd http://www.springframework.org/schema/context https://www.springframework.org/schema/context/spring-context.xsd">

    <!--引入外部的 jdbc.properties 文件-->
    <context:property-placeholder location="classpath:jdbc.properties"/>
    <!--配置数据源对象-DataSource-->
    <bean class="com.mchange.v2.c3p0.ComboPooledDataSource" id="dataSource">
        <!--给数据源对象配置属性值-->
        <property name="user" value="${jdbc.user}"/>
        <property name="password" value="${jdbc.pwd}"/>
        <property name="driverClass" value="${jdbc.driver}"/>
        <property name="jdbcUrl" value="${jdbc.url}"/>
    </bean>

    <!--配置 JdbcTemplate 对象-->
    <bean class="org.springframework.jdbc.core.JdbcTemplate" id="jdbcTemplate">
        <!--给 JdbcTemplate 对象配置 dataSource 属性-->
        <property name="dataSource" ref="dataSource"/>
    </bean>
</beans>
2
3
4
5
6
7
8
9
10
11
12
13
14
15
16
17
18
19
20
21
22
23
(7)使用 JdbcTemplate 对象完成添加数据
//测试通过 JdbcTemplate 对象完成添加数据
    @Test
    public void addDataByJdbcTemplate() {
        //获取到容器
        ApplicationContext ioc = new ClassPathXmlApplicationContext("JdbcTemplate_ioc.xml");
        //获取 JdbcTemplate 对象
        JdbcTemplate jdbcTemplate = ioc.getBean(JdbcTemplate.class);

        //添加方式 1
        //String sql = "insert into monster values(400, '红孩儿', '枪法')";
        //jdbcTemplate.execute(sql);

        //添加方式 2
        String sql = "insert into monster values(?, ?, ?)";
        int affected = jdbcTemplate.update(sql, 500, "红孩儿2", "枪法2");

        System.out.println("添加成功 affected = " + affected);
    }
2
3
4
5
6
7
8
9
10
11
12
13
14
15
16
17
18
(8)使用 JdbcTemplate 对象修改数据
//测试通过 JdbcTemplate 对象完成修改数据
    @Test
    public void updateDataByJdbcTemplate() {
        //获取到容器
        ApplicationContext ioc = new ClassPathXmlApplicationContext("JdbcTemplate_ioc.xml");

        //获取 JdbcTemplate 对象
        JdbcTemplate jdbcTemplate = ioc.getBean(JdbcTemplate.class);

        //组织 SQL
        String sql = "update monster set skill=? where id=?";
        int affected = jdbcTemplate.update(sql, "美女计", 300);
        System.out.println("成功 affected = " + affected);
    }
2
3
4
5
6
7
8
9
10
11
12
13
14
(9)使用 JdbcTemplate 批量添加两个 monster
//批量添加两个 monster
    @Test
    public void addBatchDataByJdbcTemplate() {
        //获取到容器
        ApplicationContext ioc = new ClassPathXmlApplicationContext("JdbcTemplate_ioc.xml");

        //获取 JdbcTemplate 对象
        JdbcTemplate jdbcTemplate = ioc.getBean(JdbcTemplate.class);

        String sql = "insert into monster values(?, ?, ?)";
        List<Object[]> batchArgs = new ArrayList<>();
        batchArgs.add(new Object[]{600, "老鼠精", "偷吃粮食"});
        batchArgs.add(new Object[]{700, "老猫精", "抓老鼠"});
        int[] ints = jdbcTemplate.batchUpdate(sql, batchArgs);

        for (int anInt : ints) {
            System.out.println("anInt = " + anInt);
        }
        System.out.println("成功");
    }
2
3
4
5
6
7
8
9
10
11
12
13
14
15
16
17
18
19
20
(10)查询 id=100 的 monster 并封装到 Monster 实体对象
//查询 id=100 的 monster 并封装到 Monster 实体对象
    @Test
    public void selectDataByJdbcTemplate() {
        //获取到容器
        ApplicationContext ioc = new ClassPathXmlApplicationContext("JdbcTemplate_ioc.xml");

        //获取 JdbcTemplate 对象
        JdbcTemplate jdbcTemplate = ioc.getBean(JdbcTemplate.class);

        //组织 Sql
        String sql = "select id as monsterId, name, skill from monster where id = 100";
        //使用 RowMapper 接口来对返回的数据进行封装,底层使用反射
        RowMapper<Monster> rowMapper = new BeanPropertyRowMapper<>(Monster.class);
        Monster monster = jdbcTemplate.queryForObject(sql, rowMapper);
        System.out.println("monster = " + monster);
        System.out.println("查询成功");
    }
2
3
4
5
6
7
8
9
10
11
12
13
14
15
16
17
(11)查询 id >= 200 的 monster 并封装到 Monster 实体对象
//查询 id >= 200 的 monster 并封装到 Monster 实体对象
    @Test
    public void selectMulDataByJdbcTemplate() {
        //获取到容器
        ApplicationContext ioc = new ClassPathXmlApplicationContext("JdbcTemplate_ioc.xml");

        //获取 JdbcTemplate 对象
        JdbcTemplate jdbcTemplate = ioc.getBean(JdbcTemplate.class);

        //组织 SQL
        String sql = "select id as monsterId, name, skill from monster where id >= ?";
        RowMapper<Monster> rowMapper = new BeanPropertyRowMapper<>(Monster.class);
        List<Monster> monsterList = jdbcTemplate.query(sql, rowMapper, 100);
        for (Monster monster : monsterList) {
            System.out.println("monster = " + monster);
        }
    }
2
3
4
5
6
7
8
9
10
11
12
13
14
15
16
17
(12)查询返回结果只有一行一列的值,比如查询 id = 100 的怪物名
//查询返回结果只有一行一列的值,比如查询 id = 100 的怪物名
    @Test
    public void selectScalarByJdbcTemplate() {
        //获取到容器
        ApplicationContext ioc = new ClassPathXmlApplicationContext("JdbcTemplate_ioc.xml");

        //获取 JdbcTemplate 对象
        JdbcTemplate jdbcTemplate = ioc.getBean(JdbcTemplate.class);

        //组织 SQL
        String sql = "select name from monster where id = 100";

        String name = jdbcTemplate.queryForObject(sql, String.class);
        System.out.println("返回 name = " + name);
    }
2
3
4
5
6
7
8
9
10
11
12
13
14
15
(13)使用 Map 传入具名参数完成操作,具名参数形式需要使用 NamedParameterJdbcTemplate 类,语句形式:String sql = "insert into monster values(:my_id, :name, :skill)"
<!--配置 NameParameterJdbcTemplate 对象-->
    <bean class="org.springframework.jdbc.core.namedparam.NamedParameterJdbcTemplate" id="namedParameterJdbcTemplate">
        <!--通过构造器设置数据源-->
        <constructor-arg name="dataSource" ref="dataSource"/>
    </bean>
2
3
4
5
//使用 Map 传入具名参数完成操作
    @Test
    public void testDataByNamedParameterJdbcTemplate() {
        ApplicationContext ioc = new ClassPathXmlApplicationContext("JdbcTemplate_ioc.xml");

        //得到 NamedParameterJdbcTemplate bean
        NamedParameterJdbcTemplate namedParameterJdbcTemplate = ioc.getBean(NamedParameterJdbcTemplate.class);

        //准备参数
        //具名参数就是把原来的 ? 换成具体的名称,这样赋值的时候就知道这里应该赋什么值
        String sql = "insert into monster values(:id, :name, :skill)";
        Map<String, Object> paramMap = new HashMap<>();
        //给 paramMap 填写数据
        paramMap.put("id", 800);
        paramMap.put("name", "蚂蚁精");
        paramMap.put("skill", "喜欢打洞");
        int affected = namedParameterJdbcTemplate.update(sql, paramMap);
        System.out.println("成功,affected = " + affected);
    }
2
3
4
5
6
7
8
9
10
11
12
13
14
15
16
17
18
19
(14)使用 SqlParameterSource 来封装具名参数
//使用 SqlParameterSource 来封装具名参数
    @Test
    public void operDataBySqlparametersource() {
        ApplicationContext ioc = new ClassPathXmlApplicationContext("JdbcTemplate_ioc.xml");

        //得到 NamedParameterJdbcTemplate bean
        NamedParameterJdbcTemplate namedParameterJdbcTemplate = ioc.getBean(NamedParameterJdbcTemplate.class);

        //准备参数
        String sql = "insert into monster values(:monsterId, :name, :skill)";
        Monster monster = new Monster(900, "大象精", "搬运木头");
        BeanPropertySqlParameterSource sqlParameterSource = new BeanPropertySqlParameterSource(monster);
        int affected = namedParameterJdbcTemplate.update(sql, sqlParameterSource);
        System.out.println("成功,affected = " + affected);
    }
2
3
4
5
6
7
8
9
10
11
12
13
14
15
(15)DAO 对象中使用 JdbcTemplate 完成对数据的操作
MonsterDAO
@Repository //将 MonsterDao 注入到 Spring 容器
public class MonsterDao {
    //注入一个属性
    @Resource
    private JdbcTemplate jdbcTemplate;

    //完成保存任务
    public void save(Monster monster) {
        //组织 sql
        String sql = "insert into monster values(?, ?, ?)";
        int update = jdbcTemplate.update(sql, monster.getMonsterId(), monster.getName(), monster.getSkill());
        System.out.println("成功 update = " + update);
    }
}
2
3
4
5
6
7
8
9
10
11
12
13
14
配置文件
<!--配置要扫描的包-->
    <context:component-scan base-package="com.hspedu.spring.jdbctemplate.dao"/>
2
测试
//测试 MonsterDAO
    @Test
    public void monsterDaoSave() {
        ApplicationContext ioc = new ClassPathXmlApplicationContext("JdbcTemplate_ioc.xml");
        MonsterDao monsterDao = ioc.getBean(MonsterDao.class);
        Monster monster = new Monster(1000, "小鸭精", "吃鱼");
        monsterDao.save(monster);
        System.out.println("保存成功");
    }
2
3
4
5
6
7
8
9
# 第 7 章 声明式事务
# 7.1 事务分类
(1)编程式事务:
传统方式:
Connection connection = JDBCUtils.getConnection();
try{
    //1. 先设置事务不要自动提交
    connection.setAutoCommit(false);
    //2. 进行各种 crud
    //多个表的修改,添加,删除
    //3. 提交
    connection.commit();
} catch(Exception e) {
    //4. 回滚
    connection.rollback();
}
2
3
4
5
6
7
8
9
10
11
12
(2)声明式事务
下面讲
# 7.2 声明式事务使用实例
# 7.2.1 需求说明 - 用户购买商品
我们需要去处理用户购买商品的业务逻辑,分析当一个用户要去购买商品应该包含三个步骤:
(1)通过商品 id 获取价格
(2)购买商品(某人购买商品,修改用户的余额)
(3)修改库存量
这时,我们需要涉及到三张表:商品表、用户表、商品存量表,应该使用事务处理
意思就是:当第(2)步成功但是第(3)步失败将会有影响,利用事务处理让三个步骤同时进行,所有成功才运行成功,只要有一个步骤错了就不运行,总而言之:要么全部成功,要么全部失败;不能部分成功,不能部分失败
# 7.2.2 解决方案分析
(1)使用传统的编程事务来处理,将代码写到一起【缺点:代码冗余、效率低、不利于扩展;优点:简单、好理解】
Connection connection = JDBCUtils.getConnection();
try{
    //1. 先设置事务不要自动提交
    connection.setAutoCommit(false);
    //2. 进行各种 crud
    //多个表的修改,添加,删除
    获取价格 => select from 商品表
    修改用户余额 => update...
    修改库存量 => update...
    //3. 提交
    connection.commit();
} catch(Exception e) {
    //4. 回滚
    connection.rollback();
}
2
3
4
5
6
7
8
9
10
11
12
13
14
15
(2)使用 Spring 的声明式事务处理,可以将上面三个子步骤分别写成一个方法,然后统一管理【这个是 Spring 很牛的地方,在开发中使用的很多,优点:无代码冗余、效率高、扩展方便;缺点:难以理解】
# 7.2.3 代码实现
(1)先创建商品系统的数据库和表
-- 演示声明式事务创建的表
create table user_account(
    user_id     int unsigned primary key auto_increment,
    user_name   varchar(32) not null default '',
    money       double not null default 0.0
);

insert into user_account values (null, '张三', 1000);
insert into user_account values (null, '李四', 2000);

create table goods (
    goods_id    int unsigned primary key auto_increment,
    goods_name  varchar(32) not null default '',
    price       double not null default 0.0
);

insert into goods values (null, '小风扇', 10.00);
insert into goods values (null, '小台灯', 12.00);
insert into goods values (null, '可口可乐', 3.00);

create table goods_amount(
    goods_id    int unsigned primary key auto_increment,
    goods_num   int unsigned default 0
);

insert into goods_amount values (1, 200);
insert into goods_amount values (2, 20);
insert into goods_amount values (3, 15);
2
3
4
5
6
7
8
9
10
11
12
13
14
15
16
17
18
19
20
21
22
23
24
25
26
27
28
GoodsDao
@Repository //将 GoodsDao 对象注入到 Spring 容器
public class GoodsDao {
    @Resource
    private JdbcTemplate jdbcTemplate;

    /**
    * @Author: 止束
    * @Description: 根据商品 id,返回对应的价格
    * @DateTime: 19:27 2024/6/21
    * @Params: [id]
    * @Return java.lang.Float
    */
    public Float queryPriceById(Integer id) {
        String sql = "select price from goods where goods_id = ?";
        Float price = jdbcTemplate.queryForObject(sql, Float.class, id);
        return price;
    }

    /**
    * @Author: 止束
    * @Description: 减少用户的余额
    * @DateTime: 19:30 2024/6/21
    * @Params: [user_id, money]
    * @Return void
    */
    public void updateBalance(Integer user_id, Float money) {
        String sql = "update user_account set money = money - ? where user_id = ?";
        jdbcTemplate.update(sql, money, user_id);
    }

    /**
    * @Author: 止束
    * @Description: 减少商品库存
    * @DateTime: 19:33 2024/6/21
    * @Params: [goods_id, amount]
    * @Return void
    */
    public void updateAmount(Integer goods_id, int amount) {
        String sql = "update goods_amount set goods_num = goods_num - ? where goods_id = ?";
        jdbcTemplate.update(sql, amount, goods_id);
    }
}
2
3
4
5
6
7
8
9
10
11
12
13
14
15
16
17
18
19
20
21
22
23
24
25
26
27
28
29
30
31
32
33
34
35
36
37
38
39
40
41
42
GoodsService
@Service //将 GoodsService 对象注入到 Spring 容器
public class GoodsService {
    //定义属性 GoodsDao
    @Resource
    private GoodsDao goodsDao;


    /**
    * @Author: 止束
    * @Description: 编写一个方法,完成用户购买商品的业务
    * @DateTime: 19:53 2024/6/21
    * @Params: [userId:用户 id, goodsId:商品 id, amount:购买数量]
    * @Return void
    */
    public void buyGoods(int userId, int goodsId, int amount) {

        //输出购买的相关信息
        System.out.println("用户购买的信息 userId = " + userId + " goodsId = " + goodsId + " 购买数量 = " + amount);

        //1. 得到商品的价格
        Float price = goodsDao.queryPriceById(userId);
        //2. 减少用户的余额
        goodsDao.updateBalance(userId, price * amount);
        //3. 减少库存量
        goodsDao.updateAmount(goodsId, amount);

        System.out.println("用户购买成功");
    }

    /**
     * @Author: 止束
     * @Description: @Transactional 解读:使用 @Transactional 可以进行声明式事务控制,即可以将对数据库操作的方法作为一个事务管理
     * @DateTime: 12:14 2024/6/22
     * @Params: []
     * @Return void
     */
    @Transactional
    public void buyGoodsByTx(int userId, int goodsId, int amount) {

        //输出购买的相关信息
        System.out.println("用户购买的信息 userId = " + userId + " goodsId = " + goodsId + " 购买数量 = " + amount);

        //1. 得到商品的价格
        Float price = goodsDao.queryPriceById(userId);
        //2. 减少用户的余额
        goodsDao.updateBalance(userId, price * amount);
        //3. 减少库存量
        goodsDao.updateAmount(goodsId, amount);

        System.out.println("用户购买成功");
    }
}
2
3
4
5
6
7
8
9
10
11
12
13
14
15
16
17
18
19
20
21
22
23
24
25
26
27
28
29
30
31
32
33
34
35
36
37
38
39
40
41
42
43
44
45
46
47
48
49
50
51
52
xml 配置文件
<?xml version="1.0" encoding="UTF-8"?>
<beans xmlns="http://www.springframework.org/schema/beans"
       xmlns:xsi="http://www.w3.org/2001/XMLSchema-instance"
       xmlns:context="http://www.springframework.org/schema/context" xmlns:tx="http://www.springframework.org/schema/tx"
       xsi:schemaLocation="http://www.springframework.org/schema/beans http://www.springframework.org/schema/beans/spring-beans.xsd http://www.springframework.org/schema/context https://www.springframework.org/schema/context/spring-context.xsd http://www.springframework.org/schema/tx http://www.springframework.org/schema/tx/spring-tx.xsd">

    <!--配置要扫描的包-->
    <context:component-scan base-package="com.hspedu.spring.tx.dao"/>
    <context:component-scan base-package="com.hspedu.spring.tx.service"/>
    <!--引入外部的 jdbc.properties 文件-->
    <context:property-placeholder location="classpath:jdbc.properties"/>
    <!--配置数据源对象-DataSource-->
    <bean class="com.mchange.v2.c3p0.ComboPooledDataSource" id="dataSource">
        <!--给数据源对象配置属性值-->
        <property name="user" value="${jdbc.user}"/>
        <property name="password" value="${jdbc.pwd}"/>
        <property name="driverClass" value="${jdbc.driver}"/>
        <property name="jdbcUrl" value="${jdbc.url}"/>
    </bean>

    <!--配置 JdbcTemplate 对象-->
    <bean class="org.springframework.jdbc.core.JdbcTemplate" id="jdbcTemplate">
        <!--给 JdbcTemplate 对象配置 dataSource 属性-->
        <property name="dataSource" ref="dataSource"/>
    </bean>

    <!--配置事务管理器-对象
        1. DataSourceTransactionManager 这个对象是进行事务管理的
        2. 一定要配置数据源属性,这样可以指定该事务管理器是对哪个数据源进行事务控制
    -->
    <bean class="org.springframework.jdbc.datasource.DataSourceTransactionManager" id="transactionManager">
        <property name="dataSource" ref="dataSource"/>
    </bean>

    <!--配置启动基于注解的声明式事务管理功能-->
    <tx:annotation-driven transaction-manager="transactionManager"/>

</beans>
2
3
4
5
6
7
8
9
10
11
12
13
14
15
16
17
18
19
20
21
22
23
24
25
26
27
28
29
30
31
32
33
34
35
36
37
38
测试
//测试用户购买商品业务
    @Test
    public void buyGoodsTest() {
        //获取到容器
        ApplicationContext ioc = new ClassPathXmlApplicationContext("tx_ioc.xml");

        GoodsService goodsService = ioc.getBean(GoodsService.class);
        goodsService.buyGoods(1, 1, 1);
    }

    //测试用户购买商品业务
    @Test
    public void buyGoodsByTxTest() {
        //获取到容器
        ApplicationContext ioc = new ClassPathXmlApplicationContext("tx_ioc.xml");

        GoodsService goodsService = ioc.getBean(GoodsService.class);
        goodsService.buyGoodsByTx(1, 1, 1); //这里调用的是进行了事务声明的方法
    }
2
3
4
5
6
7
8
9
10
11
12
13
14
15
16
17
18
19
# 7.3 事务的传播机制
# 7.3.1 事务的传播机制说明
(1)当有多个事务处理并存时,如何控制?比如用户去购买两次商品(使用不同的方法),每个方法都是一个事务,那么如何控制呢?
(2)这个就是事务的传播机制
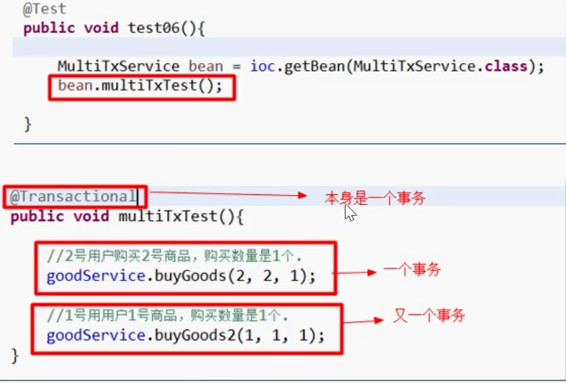
(3)如上图中 multiTxTest 方法本身是一个事务,buyGoods 方法和 buyGoods2 方法也都是一个事务,那么当调用 buyGoods 方法时是使用 buyGoods 方法的事务还是使用 multiTxTest 方法的事务?这就是事务传播机制
# 7.3.2 事务传播机制种类
(1)事务传播的属性/种类一览图

(2)事务传播的属性/种类机制分析,重点分析了 REQUIRED 和 REQUIRES_NEW 两种事务传播属性,其它了解即可
(3)如果设置为 REQUIRED 时,buyGoods2 和 buyGoods 是一个整体,只要有方法的事务错误,那么两个方法都不会执行成功
如果设置为 REQUIRES_NEW 时,buyGoods2 如果错误,不会影响到 buyGoods,反之亦然,即它们的事务是独立的
# 7.3.3 事务的传播机制的应用实例
(1)需求说明:比如用户去购买两次商品(使用不同的方法),每个方法都是一个事务,那么如何控制呢?
@Repository //将 GoodsDao 对象注入到 Spring 容器
public class GoodsDao {
    @Resource
    private JdbcTemplate jdbcTemplate;

    /**
    * @Author: 止束
    * @Description: 根据商品 id,返回对应的价格
    * @DateTime: 19:27 2024/6/21
    * @Params: [id]
    * @Return java.lang.Float
    */
    public Float queryPriceById(Integer id) {
        String sql = "select price from goods where goods_id = ?";
        Float price = jdbcTemplate.queryForObject(sql, Float.class, id);
        return price;
    }

    /**
    * @Author: 止束
    * @Description: 减少用户的余额
    * @DateTime: 19:30 2024/6/21
    * @Params: [user_id, money]
    * @Return void
    */
    public void updateBalance(Integer user_id, Float money) {
        String sql = "update user_account set money = money - ? where user_id = ?";
        jdbcTemplate.update(sql, money, user_id);
    }

    /**
    * @Author: 止束
    * @Description: 减少商品库存
    * @DateTime: 19:33 2024/6/21
    * @Params: [goods_id, amount]
    * @Return void
    */
    public void updateAmount(Integer goods_id, int amount) {
        String sql = "update goods_amount set goods_num = goods_num - ? where goods_id = ?";
        jdbcTemplate.update(sql, amount, goods_id);
    }

    /**
     * @Author: 止束
     * @Description: 根据商品 id,返回对应的价格
     * @DateTime: 19:27 2024/6/21
     * @Params: [id]
     * @Return java.lang.Float
     */
    public Float queryPriceById2(Integer id) {
        String sql = "select price from goods where goods_id = ?";
        Float price = jdbcTemplate.queryForObject(sql, Float.class, id);
        return price;
    }

    /**
     * @Author: 止束
     * @Description: 减少用户的余额
     * @DateTime: 19:30 2024/6/21
     * @Params: [user_id, money]
     * @Return void
     */
    public void updateBalance2(Integer user_id, Float money) {
        String sql = "update user_account set money = money - ? where user_id = ?";
        jdbcTemplate.update(sql, money, user_id);
    }

    /**
     * @Author: 止束
     * @Description: 减少商品库存
     * @DateTime: 19:33 2024/6/21
     * @Params: [goods_id, amount]
     * @Return void
     */
    public void updateAmount2(Integer goods_id, int amount) {
        String sql = "update goods_amount set goods_num = goods_num - ? where goods_id = ?";
        jdbcTemplate.update(sql, amount, goods_id);
    }
}
2
3
4
5
6
7
8
9
10
11
12
13
14
15
16
17
18
19
20
21
22
23
24
25
26
27
28
29
30
31
32
33
34
35
36
37
38
39
40
41
42
43
44
45
46
47
48
49
50
51
52
53
54
55
56
57
58
59
60
61
62
63
64
65
66
67
68
69
70
71
72
73
74
75
76
77
78
79
@Service //将 GoodsService 对象注入到 Spring 容器
public class GoodsService {
    //定义属性 GoodsDao
    @Resource
    private GoodsDao goodsDao;


    /**
    * @Author: 止束
    * @Description: 编写一个方法,完成用户购买商品的业务
    * @DateTime: 19:53 2024/6/21
    * @Params: [userId:用户 id, goodsId:商品 id, amount:购买数量]
    * @Return void
    */
    public void buyGoods(int userId, int goodsId, int amount) {

        //输出购买的相关信息
        System.out.println("用户购买的信息 userId = " + userId + " goodsId = " + goodsId + " 购买数量 = " + amount);

        //1. 得到商品的价格
        Float price = goodsDao.queryPriceById(userId);
        //2. 减少用户的余额
        goodsDao.updateBalance(userId, price * amount);
        //3. 减少库存量
        goodsDao.updateAmount(goodsId, amount);

        System.out.println("用户购买成功");
    }

    /**
     * @Author: 止束
     * @Description: @Transactional 解读:使用 @Transactional 可以进行声明式事务控制,即可以将对数据库操作的方法作为一个事务管理
     * @DateTime: 12:14 2024/6/22
     * @Params: []
     * @Return void
     */
    @Transactional(propagation = Propagation.REQUIRES_NEW)
    public void buyGoodsByTx(int userId, int goodsId, int amount) {

        //输出购买的相关信息
        System.out.println("用户购买的信息 userId = " + userId + " goodsId = " + goodsId + " 购买数量 = " + amount);

        //1. 得到商品的价格
        Float price = goodsDao.queryPriceById(userId);
        //2. 减少用户的余额
        goodsDao.updateBalance(userId, price * amount);
        //3. 减少库存量
        goodsDao.updateAmount(goodsId, amount);

        System.out.println("用户购买成功");
    }


    //这个方法是第二套进行商品购买的方法
    @Transactional(propagation = Propagation.REQUIRES_NEW)
    public void buyGoodsByTx2(int userId, int goodsId, int amount) {

        //输出购买的相关信息
        System.out.println("用户购买的信息 userId = " + userId + " goodsId = " + goodsId + " 购买数量 = " + amount);

        //1. 得到商品的价格
        Float price = goodsDao.queryPriceById2(userId);
        //2. 减少用户的余额
        goodsDao.updateBalance2(userId, price * amount);
        //3. 减少库存量
        goodsDao.updateAmount2(goodsId, amount);

        System.out.println("用户购买成功");
    }
}
2
3
4
5
6
7
8
9
10
11
12
13
14
15
16
17
18
19
20
21
22
23
24
25
26
27
28
29
30
31
32
33
34
35
36
37
38
39
40
41
42
43
44
45
46
47
48
49
50
51
52
53
54
55
56
57
58
59
60
61
62
63
64
65
66
67
68
69
70
@Service
public class MultiplyService {
    @Resource
    private GoodsService goodsService;

    /**
     * multiBuyGoodsByTx 这个方法有两次购买商品的操作
     * buyGoodsByTx 和 buyGoodsByTx2 都是声明式事务
     * 当前 buyGoodsByTx 和 buyGoodsByTx2 使用的传播属性是默认的 REQUIRED,即会当做一个整体事务进行管理
     * 比如 buyGoodsByTx 方法成功,但是 buyGoodsByTx2 失败,会造成整个事务回滚,即会回滚 buyGoodsByTx
     * 如果 buyGoodsByTx 和 buyGoodsByTx2 事务传播属性修改成 REQUIRES_NEW,这时两个方法的事务是独立的,也就是说如果 buyGoodsByTx 成功但是 buyGoodsByTx2 失败,不会造成 buyGoodsByTx 回滚
     * */
    @Transactional
    public void multiBuyGoodsByTx() {
        goodsService.buyGoodsByTx(1,1,1);
        goodsService.buyGoodsByTx2(1,1,1);
    }
}
2
3
4
5
6
7
8
9
10
11
12
13
14
15
16
17
18
<?xml version="1.0" encoding="UTF-8"?>
<beans xmlns="http://www.springframework.org/schema/beans"
       xmlns:xsi="http://www.w3.org/2001/XMLSchema-instance"
       xmlns:context="http://www.springframework.org/schema/context" xmlns:tx="http://www.springframework.org/schema/tx"
       xsi:schemaLocation="http://www.springframework.org/schema/beans http://www.springframework.org/schema/beans/spring-beans.xsd http://www.springframework.org/schema/context https://www.springframework.org/schema/context/spring-context.xsd http://www.springframework.org/schema/tx http://www.springframework.org/schema/tx/spring-tx.xsd">

    <!--配置要扫描的包-->
    <context:component-scan base-package="com.hspedu.spring.tx.dao"/>
    <context:component-scan base-package="com.hspedu.spring.tx.service"/>
    <!--引入外部的 jdbc.properties 文件-->
    <context:property-placeholder location="classpath:jdbc.properties"/>
    <!--配置数据源对象-DataSource-->
    <bean class="com.mchange.v2.c3p0.ComboPooledDataSource" id="dataSource">
        <!--给数据源对象配置属性值-->
        <property name="user" value="${jdbc.user}"/>
        <property name="password" value="${jdbc.pwd}"/>
        <property name="driverClass" value="${jdbc.driver}"/>
        <property name="jdbcUrl" value="${jdbc.url}"/>
    </bean>

    <!--配置 JdbcTemplate 对象-->
    <bean class="org.springframework.jdbc.core.JdbcTemplate" id="jdbcTemplate">
        <!--给 JdbcTemplate 对象配置 dataSource 属性-->
        <property name="dataSource" ref="dataSource"/>
    </bean>

    <!--配置事务管理器-对象
        1. DataSourceTransactionManager 这个对象是进行事务管理的
        2. 一定要配置数据源属性,这样可以指定该事务管理器是对哪个数据源进行事务控制
    -->
    <bean class="org.springframework.jdbc.datasource.DataSourceTransactionManager" id="transactionManager">
        <property name="dataSource" ref="dataSource"/>
    </bean>

    <!--配置启动基于注解的声明式事务管理功能-->
    <tx:annotation-driven transaction-manager="transactionManager"/>

</beans>
2
3
4
5
6
7
8
9
10
11
12
13
14
15
16
17
18
19
20
21
22
23
24
25
26
27
28
29
30
31
32
33
34
35
36
37
38
//测试事务的传播机制
    @Test
    public void multiBuyGoodsByTxTest() {
        //获取到容器
        ApplicationContext ioc = new ClassPathXmlApplicationContext("tx_ioc.xml");

        MultiplyService multiplyService = ioc.getBean(MultiplyService.class);

        multiplyService.multiBuyGoodsByTx();
    }
2
3
4
5
6
7
8
9
10
# 7.4 事务的隔离级别
# 7.4.1 事务隔离级别说明
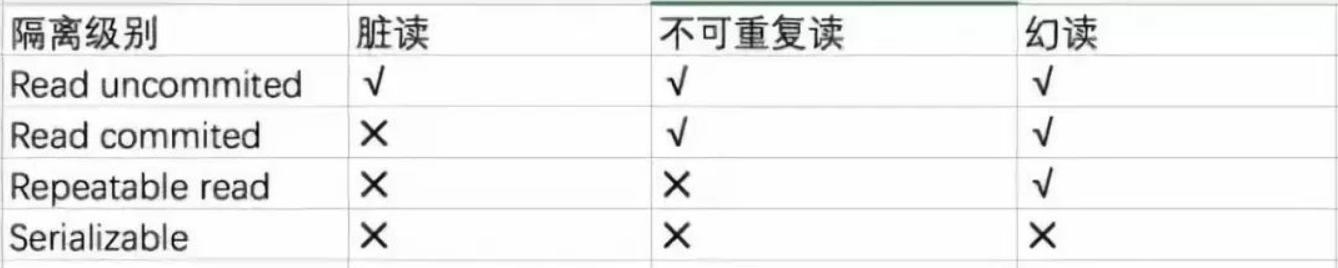
(1)默认的隔离级别,就是 MySQL 数据库默认的隔离级别,一般为 Repeatable_read
# 7.4.2 事务隔离级别的设置和测试
(1)修改 GoodsService.java,先测默认隔离级别,增加方法 buyGoodsByTxISOLATION()
//在默认情况下,声明式事务的隔离级别是 REPEATABLE_READ
    //这里我们将 buyGoodsByTxISOLATION 的隔离级别设置为 Isolation.READ_COMMITTED,表示只要是提交了的数据,在当前事务是可以读取到最新数据的
    @Transactional(isolation = Isolation.READ_COMMITTED)
    public void buyGoodsByTxISOLATION() {
        //查询两次商品的价格
        Float price = goodsDao.queryPriceById(1);
        System.out.println("第一次查询的 price = " + price);

        Float price2 = goodsDao.queryPriceById(1);
        System.out.println("第一次查询的 price2 = " + price2);
    }
2
3
4
5
6
7
8
9
10
11
//测试声明式事务的隔离级别
    @Test
    public void buyGoodsByTxISOLATIONTest() {
        //获取到容器
        ApplicationContext ioc = new ClassPathXmlApplicationContext("tx_ioc.xml");

        GoodsService goodsService = ioc.getBean(GoodsService.class);
        goodsService.buyGoodsByTxISOLATION();
    }
2
3
4
5
6
7
8
9
# 7.4.3 事务的超时回滚
(1)如果一个事务执行的时间超过某个时间限制,就让该事务回滚
(2)可以通过设置事务超时回滚来实现
(3)修改 GoodsService.java,增加 buyGoodsByTxTimeout()
/**
    * timeout = 2 表示 buyGoodsByTxTimeout 如果执行时间超过了 2 秒,那么该事务就进行回滚,如果没有设置 timeout,默认是 -1,表示使用事务的默认超时时间或者不支持
    */
    @Transactional(timeout = 2)
    public void buyGoodsByTxTimeout(int userId, int goodsId, int amount) {
        //输出购买的相关信息
        System.out.println("用户购买的信息 userId = " + userId + " goodsId = " + goodsId + " 购买数量 = " + amount);

        //1. 得到商品的价格
        Float price = goodsDao.queryPriceById2(userId);
        //2. 减少用户的余额
        goodsDao.updateBalance2(userId, price * amount);

        //模拟超时
        System.out.println("=====超时开始4s=====");
        try {
            Thread.sleep(4000);
        } catch (InterruptedException e) {
            throw new RuntimeException(e);
        }
        System.out.println("=====超时开始4s=====");

        //3. 减少库存量
        goodsDao.updateAmount2(goodsId, amount);

        System.out.println("用户购买成功");
    }
2
3
4
5
6
7
8
9
10
11
12
13
14
15
16
17
18
19
20
21
22
23
24
25
26
27
//测试 timeout 属性
    @Test
    public void buyGoodsByTxTimeoutTest() {
        //获取到容器
        ApplicationContext ioc = new ClassPathXmlApplicationContext("tx_ioc.xml");

        GoodsService goodsService = ioc.getBean(GoodsService.class);
        goodsService.buyGoodsByTxTimeout(1,1,1);
    }
2
3
4
5
6
7
8
9
# 7.5 课后作业
模拟一个用户,进行银行转账购买淘宝商品的业务,分别有 数据表/dao/service,保证数据一致性
(1)数据表有:seller[卖家]、buyer[买家]、goods[商品表[库存量]]、taoBao[提取入账成交额的 10%]
(2)要求简单实现,使用声明式事务完成
(3)要求创建一个新的 Spring 容器配置文件 shopping_ioc.xml,完成测试
数据表:
-- 作业

-- 卖家表
create table seller (
    id int unsigned primary key auto_increment,
    uname varchar(32) not null default '',
    money double not null default 0.0
);
insert into seller values (null, '张三', 1000);
insert into seller values (null, '李四', 2000);

-- 买家
create table buyer (
    id int unsigned primary key auto_increment,
    uname varchar(32) not null default '',
    money double not null default 0.0
);
insert into buyer values (null, '王五', 1000);
insert into buyer values (null, '赵六', 2000);


-- 商品表
create table goods2 (
    goods_id int unsigned primary key auto_increment,
    goods_name varchar(32) not null default '',
    price double not null  default 0.0,
    amount int unsigned default 0
);
insert into goods2 values (null, '小风扇', 10.00, 10000);
insert into goods2 values (null, '小台灯', 12.00, 10000);
insert into goods2 values (null, '可口可乐', 3.00, 10000);

-- 淘宝表
create table taobao (
    id int unsigned primary key auto_increment,
    money double not null default 0.0
);
insert into taobao values (null, 0);
2
3
4
5
6
7
8
9
10
11
12
13
14
15
16
17
18
19
20
21
22
23
24
25
26
27
28
29
30
31
32
33
34
35
36
37
38
Dao层:
BuyerDao
@Repository
public class BuyerDao {
    @Resource
    private JdbcTemplate jdbcTemplate;

    //从买家表中扣除金额
    public void updateMoney(int id, double money) {
        String sql = "update buyer set money = money - ? where id = ?";
        jdbcTemplate.update(sql, money, id);
    }
}
2
3
4
5
6
7
8
9
10
11
SellerDao
@Repository
public class SellerDao {
    @Resource
    private JdbcTemplate jdbcTemplate;

    //对卖家的账号增加金额
    public void updateMoney(int id, double money) {
        String sql = "update seller set money = money + ? where id = ?";
        jdbcTemplate.update(sql, money, id);
    }
}
2
3
4
5
6
7
8
9
10
11
Goods2Dao
@Repository
public class Goods2Dao {
    @Resource
    private JdbcTemplate jdbcTemplate;

    //根据商品 id,返回价格
    //返回单行单列
    public Double queryPriceById(int goodsId) {
        String sql = "select price from goods2 where goods_id = ?";
        Double price = jdbcTemplate.queryForObject(sql, Double.class, goodsId);
        return price;
    }

    //根据商品 id,减去库存
    public void updateAmount(int goodsId, int amount) {
        String sql = "update goods2 set amount = amount - ? where goods_id = ?";
        jdbcTemplate.update(sql, amount, goodsId);
    }
}
2
3
4
5
6
7
8
9
10
11
12
13
14
15
16
17
18
19
TaobaoDao
@Repository
public class TaobaoDao {
    @Resource
    private JdbcTemplate jdbcTemplate;

    //给 id = 1 的 taobao 账号增加金额
    public void updateMoney(int id, double money) {
        String sql = "update taobao set money = money + ? where id = ?";
        jdbcTemplate.update(sql, money, id);
    }
}
2
3
4
5
6
7
8
9
10
11
Service层
Goods2Service
@Service
public class Goods2Service {
    @Resource
    private BuyerDao buyerDao;
    @Resource
    private SellerDao sellerDao;
    @Resource
    private Goods2Dao goods2Dao;
    @Resource
    private TaobaoDao taobaoDao;

    //用户的购买商品的行为会操作多张表,视为一个事务进行管理
    @Transactional
    public void shopping(int goodsId, int buyerId, int sellerId, int amount) {
        Double price = goods2Dao.queryPriceById(goodsId);
        //花费多少钱
        double money = price * amount;
        buyerDao.updateMoney(buyerId, money);
        //将成交额的 90% 转入卖家
        sellerDao.updateMoney(sellerId, money * 0.9);
        //将成交额的 10% 转入到淘宝账号
        taobaoDao.updateMoney(1, money * 0.1);
        //减去商品的库存
        goods2Dao.updateAmount(goodsId, amount);
    }
}
2
3
4
5
6
7
8
9
10
11
12
13
14
15
16
17
18
19
20
21
22
23
24
25
26
XML 配置文件
shopping_ioc.xml
<?xml version="1.0" encoding="UTF-8"?>
<beans xmlns="http://www.springframework.org/schema/beans"
xmlns:xsi="http://www.w3.org/2001/XMLSchema-instance"
xmlns:context="http://www.springframework.org/schema/context" xmlns:tx="http://www.springframework.org/schema/tx"
xsi:schemaLocation="http://www.springframework.org/schema/beans http://www.springframework.org/schema/beans/spring-beans.xsd http://www.springframework.org/schema/context https://www.springframework.org/schema/context/spring-context.xsd http://www.springframework.org/schema/cache http://www.springframework.org/schema/cache/spring-cache.xsd http://www.springframework.org/schema/tx http://www.springframework.org/schema/tx/spring-tx.xsd">
<!--引入外部属性文件 jdbc.properties-->
<context:property-placeholder location="classpath:jdbc.properties"/>
<!--配置数据源 DataSource-->
<bean class="com.mchange.v2.c3p0.ComboPooledDataSource" id="dataSource">
<!--设置属性值-->
<property name="user" value="${jdbc.user}"/>
<property name="password" value="${jdbc.pwd}"/>
<property name="driverClass" value="${jdbc.driver}"/>
<property name="jdbcUrl" value="${jdbc.url}"/>
</bean>
<!--配置 JdbcTemplate 对象-->
<bean class="org.springframework.jdbc.core.JdbcTemplate" id="jdbcTemplate">
<!--配置属性 DataSource-->
<property name="dataSource" ref="dataSource"/>
</bean>
<!--配置事务管理器-->
<bean class="org.springframework.jdbc.datasource.DataSourceTransactionManager" id="dataSourceTransactionManager">
<!--配置数据源-->
<property name="dataSource" ref="dataSource"/>
</bean>
<!--配置启动基于注解的声明式事务管理功能-->
<tx:annotation-driven transaction-manager="dataSourceTransactionManager"/>
<!--配置进行扫描的包-->
<context:component-scan base-package="com.hspedu.spring.tx.homework"/>
</beans>
2
3
4
5
6
7
8
9
10
11
12
13
14
15
16
17
18
19
20
21
22
23
24
25
26
27
28
29
30
31
32
33
34
35
36
测试
ShoppingTest
public class ShoppingTest {
@Test
public void shopping_() {
ApplicationContext ioc = new ClassPathXmlApplicationContext("shopping_ioc.xml");
Goods2Service goods2Service = ioc.getBean(Goods2Service.class);
goods2Service.shopping(1,1,1,1);
System.out.println("购买成功");
}
}
2
3
4
5
6
7
8
9